How to choose Sake online

For those of you that follow this blog closely you have probably noticed that I am not just writing about the culinary side of Japan to share my experiences. I also share my knowledge. On- and offline and plan on bringing more and more Japanese culinary delights to Europe for you.

Tonbo-Sake online now

As such tonbo.de opened its doors a little while ago. Currently stocked with this wonderful ambrosia called sake it will continue to grow as a source for culinary highlights from Japan.

When it comes to sake, there is no such thing as the one right way to choose. Neither with the sake you find at tonbo.de nor with any other sake shop. The categories in the shop are a good start as well as the individual descriptions. But let’s be honest – however good they might be after you have read the third or fourth the amount of information that sticks gets less and less.

How to choose sake

In order to make it easier to decide for your next sake, I created this Tonbo-Sake-Flow-Chart. Take it as a start to give you an idea. A heads-up to help you in your decision making process.

There are a lot of things worth knowing about sake. Things that will help you understand sake, choose sake and value sake. Going forward I will share more of my love for sake with you and will be posting more about sake so that you can gradually learn as you read this blog, should you decide to follow me, which would be a great pleasure. Drop me a line if there is a topic that you really want to know more about.

Kampai – Have a good weekend!

Cooking Craft Workshop in Berlin: Umami and the essentials of Japanese Cuisine

Is umami one of those hip trends that shakes up the food scene for a while only to vanish in the unknown to make space for another trend? My answer is no – umami has been around for more than 2000 years. And it is not a Japanese phenomenon. It is essential part of the world’s cuisine – from East to West and North to South.

Given the distinct flavors of e.g. sweet and sour, umami is hard to describe. Two days ago I go the nicest description of umami so far: “Umami is that deep pleasure, it simply makes me happy”.

Because of that it is worth to know what umami is, how it tastes and how it can be created and influenced. This is what I am going to tackle during my craft workshop for the Food Entrepreneurs Club. But I will also cover the essentials of Japanese cuisine. How respecting food is essential for the taste, why #nowastecooking is not a trend but a century old tradition and how this enlivens cooking creativity.

Booking just opened a couple of days ago, so hop over to the Food Entrepreneurs Club and get your spot.

Growing Young Ginger @ Home

Oh, I do not like January. I never did. Somehow I adore the cozy cold days until New Years, but right afterwards I get all excited on those rare moments of warm January-sunrays that foster the seeds of spring feeling and make me go out to buy tulips for our home. Often though by the time I get home though the world around me is again cloudy and cold. But anyway – I still have a small glimpse of spring for you today. A restless little piece of ginger reminded me that it is a good time to start to grow your own – at least when you live in a colder climate. Young ginger has many wonderful uses and here you find how to make your own pickled ginger. Ginger is absolutely easy to grow at home, so in order to get a good crop this fall start now and you are all set.

How to Grow Ginger at Home

To grow ginger yourself all you need is a bit of patience and space for the plants later on.

Take some oft the ginger you can buy at the supermarket. You see some kind of ‚eyes’ on the root. Cut them off and put them in a bowl with a tiny bit of water. You only need the bottom to be covered slightly (too much water causes the ginger to mold). Cover the bowl loosely (not airtight) with clear plastic, put it on a windowsill and wait. About every two days check the water level and adjust if necessary.

After a couple of days you can see the color oft he eyes turning brighter. Some even change to light green. After one or two weeks you can see air roots developing from the little ginger tranche that will keep on growing towards the water on the bottom. The stem usually start to develop in week three to four. I keep them in the bowl until the stem is about 4-6 cm. After that I would plant it in soil, but still keep it inside (given our local temperatures in early spring) until it gets warm enough. To grow ginger in Europe it takes a good eight to ten months to develop nice young roots big enough to be consumed. So this is usually in late fall when the leaves turn color. You can eat the roots right away or dry them to get more mature ginger like you would in the supermarket.

I know that I have not been posting a lot lately, but if you still don#t want to miss out on news, subscribe to the newletter.


Green Beans with Walnut Miso

One way to change from slumber to wide awake is stepping barefoot on a Lego brick. I assume an experience that all parents somehow share. Sooner or later they will get you – or your foot. These days at our home those evil Lego bricks collude with walnut shells. Lucky me! While still deciding which one hurts more, my patience not to curse full-throated through our home gets tested almost every day.

What is left from our big pile of walnuts

On our family vacation we collected this huge bag walnuts from the garden and I never expected them to be that popular among my girls. Even more so I was surprised about their speed in using the nutcracker, which kind of explains the shells all over our living room. But those nuts are magic. They turn tired, cranky and hungry little monsters that come home fighting after a long day of school and kindergarten into a cheerful little gang collaborating in cracking and eating those nuts.

Who am I to change this dynamic, although I actually planed a different use for the walnuts: I wanted to make a batch of walnut miso sauce, which is one of my favorite addition to blanched green beans (and always good to have in your fridge for when you are running out of time). But its use is far from being limited to that. I can think of many vegetables that would benefit from being topped with walnut miso sauce and I even like it a s a dip. So before they are all gone, I grabbed a few handful for tonights dinner.

Recipe for Green beans in Walnut Miso sauce

Serves 6

  • 300g green beans
  • 150ml (Kombu) dashi
  • Splash of soy sauce and mirin
  • Splash of mirin (sweet sake)
  • 80 g shelled walnut
  • A heaped 1  Tbsp.  white, sweet miso
  • 2 tsp. mirin
  • a splash or more  of (kombu) dashi

Method

Pour 150 ml (kombu) dashi in a wide container and season it with a splash of soy sauce and mirin .

Green beans waiting in dashi to be plated

Bring a fairly large pot with water to a rolling boil and blanch the beans until they are tender but still firm (about five minutes after the water has returned to a boil). Drain and DO NOT refresh them in cold water, but put them in the seasoned dashi instead.

Dry-roasting walnuts

Dry roast the walnuts in a pan over medium heat. Use a suribachi (Japanese mortar) to grind the nuts until they form a paste. If you don’t have a suribachi use a western style mortar and pestle instead. Mix the walnuts with the miso and the mirin and thin it out with (kombu) dashi to your preferred consistency. You may do this in a separate bowl or in the suribachi to avoid any loss.

Crushed walnuts

Take the green beans from the dashi, cut them to your preferred length (depending on your serving style) and arrange them with the walnut miso sauce. You can either coat them by mixing it with the sauce in the suribachi (and use the suribachi as a serving bowl) or serve the green beans on a plate and arrange the sauce on top.

Final Dish: Green beans with walnut miso sauce on top

Tip: You can prepare a lager amount of walnut miso sauce and keep it in the fridge for later use. In this case omit the dashi until you are ready to use it.

Storing Water Kefir Crystals

So we are definitely hooked. Hooked on water kefir. A couple of days ago I bottled quite an amount to take on a family vacation trip, but it was gone within three days. Back home the first thing I did was starting a new batch. Four new batches to be precise. Being relatively new to water kefir I want to really understand it and as such I experimented with the way to store water kefir. Whether you are absent for a couple of days or want to have a break for a bit longer, it is good to know what works and how it will influence the end product.

How to store water kefir (for a long time)

So before we went on vacation, I made 50g-portions of the water kefir crystals and stored them in four different ways:

Waterkefir crystals covered with icing sugar. The sugar will melt and form a syrupy brownish liquid
  1. Fridge:
    Water kefir crystals floating in 10% sugar water in the fridge (in a loosely lidded non-reactive container),
  2. Fridge:
    Water kefir crystals covered with icing sugar (in a loosely lidded non-reactive container),
  3. Freezer:
    Freezing water kefir crystals, barely covered in 10% sugar water and
  4. Dryed:
    Water kefir crystals laid out to dry on a of clean piece of cotton, stored well aerated at room temperature
Dried water kefir crystals shrink about 80% and chance from translucent to brown

How to Reconstitute water kefir

A couple of days ago I slowly defrosted my frozen water kefir crystals and prepared four identical jars to reconstitute the water kefir, hoping for yummy lemonade at the end. Each jar contains:

  1. One liter water
  2. 80g caster sugar
  3. two dried prunes
  4. one dried fig
  5. two slices organic lemon (with the peel)

After the first 12 hours all but the pre-frozen water kefir crystals showed -although significantly restrained -definite signs of fermenting activity: carbon dioxide is rising and the crystals seem to grow and split which is normal behavior during the fermentation. After 24 hours all four jars were happily fermenting and I could test the taste of their products after 48 hours:

After 48 hours all four jars were on their way.

10%Sugar Water Sugared Dried Frozen
Sweet/Sour Very sour Very sweet sweet pleasant
Bitter very bitter medium bitter medium
CO2 Very low low medium medium
Amount of crystals 119g 80g 44g 126g

Outcome

Resulting water kefir after storage. Difference in taste and color

Type and  Time of Storage

All four ways of preserving water kefir crystals were successful, in the way that all of the crystals survived and could be re-activated for further fermentation. I assume that storing water kefir crystals for a long time in sugar water in the fridge might be problematic. Even though the temperature reduces the activity, is still happens and as such at some point of time the yeast will rund out of food. So i would opt for drying or freezing the crystals if the storage is intended to last for several weeks or a couple of months.

Taste and Reconstitution

In favor of comparison I used 50g water kefir crystals for each way of storing. In the end my little experiment showed that the different ways of preserving the crystals have an impact on their return to a normal activity level:

  • Using the sugar water method has practically no impact on the activity. That is the reason why the lemonade turned out too sour and almost without CO2. The 50g that I put to storage were too much for the 1l sugar water I used for reconstitution.
  • The crystals that were sored in icing sugar took a little while to get back to normal fermentation mode and as a result the residual sugar in the lemonade was unpleasantly high. Given that the possible storage time is about the same as using sugar water I do not see an advantage using this method.
  • The dried water crystals didn’t propagate well compared to the initial amount. But given that the 50g reduced to 10 after being dried, the 44g are not too bad. A reduced fermentation activity seems logic with this drastic way of preservation and the result was satisfactory.
  • Freezing water crystals works well. Initially I thought that -18 C will ultimately kill the bacteria, but due to their very slow fermentation in the beginning the 50g/1l-water ratio resulted in a very good lemonade.

Summary

As a result all water kefir crystals have survived, but only the frozen ones produced a pleasant lemonade right afterwards, whereas the first batch of the other three methods had a difficult taste. The second batches however, with the right amounts (see recipe here), were indistinguishable.

  • Water kefir crystals can easily be stored long- and short term
  • The more drastic the method (freezing/drying vs. sugar water) the slower the re-entry into fermentation mode
  • The first lemonade will most likely not have a pleasant taste, but all methods have a normal taste after that.

Japanese Water Crystal Lemonade

Our Family got bigger. Unfortunate for the grandparents and the girls it is not another baby – only water kefir. It lives happily together with all the other jars and containers that are bubbling and fermenting whatever is inside and produces continuously yummy, healthy lemonade.

Water kefir is kind of like the German ‘Hermann cake’ or the Amish Friendship Bread, that was popular when I was a kid. Except of my husband I don’t know any kid of the 70’s and 80’s that has not brought one home from school.

What is water kefir?

Also named Japanese water crystal, water kefir is a symbiosis of yeast and bacteria – similar to kombucha, that will culture sugar water in a couple of hours to make a naturally fermented homemade soda that is rich in probiotics, B vitamins and food enzymes. In its basic form the taste reminds me of bitter lemon or ‘Fedeweißer’, the partially fermented young wine that comes to the market in Europe in late September/early October.

Fermenting water kefir

To my knowledge water kefir is not produced commercially, but it is easy to get the grains online, although I found a huge difference in price. Some individual vendors hand off their grains for free if you pay postage and some commercial companies sell the same amount – 30g (enough for one liter) – for as much as 18,90€.

In the beginning you don’t need more than those 30g, because in a favorable environment (relatively hard water and enough food (sugar, nitrogen) for the yeast & bacteria) water kefir grows fast. An increase of 25% is almost happening and I have seen it doubling often as well. All you need is relatively hard water, sugar and some dried fruits.

This is what I put in my water kefir the time. A mix of dried prunes and figures, raw sugar, lemon and ginger

Recipe for one liter water kefir

  • 1 liter water (25% warm water, 75% cold water)
  • 75g Sugar
  • 2 round slices of an organically grown lemon (if you don’t like a slightly bitter taste remove the peel)
  • 3 dried figs
  • 30g water kefir grains
  • glass jar that holds 1,5l (without lid)
  • clean cotton cloth
  • rubber band or string

Method

Dissolve the sugar in the warm water and mix it with the cold water to get one liter sweet water at room temperature. Put the rest of the ingredients into a clean glass jar and fill it up with the sweet water. Put a clean cotton cloth on top and secure it with a rubber band or a string, so that the developing carbon dioxide can escape Now leave it to ferment for about 48 hours at room temperature. Unlike kombucha it doesn’t need to be dark, but avoid direct sunlight.

When its done, take out the dried fruit and the slices of lemon and strain the lemonade through a plastic strainer, catching the water kefir grains. Rinse the grains and wash the jar before starting your next batch.

You can drink your lemonade right away or fill it in glass bottles and put it into the fridge for a second fermentation. The remaining micro-organism will ferment the slower than the water kefir grains, so it is safe to put a lid on the bottle. Trapping the carbon dioxide during the second fermentation results in a refreshing, nicely prickly lemonade!

Starting out water kefir with some crystals, dried fruits and lemon

Changing the taste of your lemonade

Water kefir offers a gazillion ways to change the taste, inviting you to experiment with whatever you can think of. Play with the ingredients and/or with the time and temperature of fermentation until you have found your favorite style. E.g. if you prefer it not so sweet, extend the fermentation time, so more of the sugar is being consumed by the yeast. When playing with the recipe, make sure that you always have…

  1. Some form of liquid (water or tea)
  2. Some sort of sugar (honey, brown sugar, maple syrup etc.)
  3. Some sort of dried, non-sulfurized fruits
  4. Some sort of natural acid (lemon, grapefruit, lime …)
  5. Optional: edible flowers, herbs, fruits, aromates (e.g. ginger, cinnamon, vanilla pod…)

Some combinations that I have tried or that I have on my list to try when the season has arrived are

  • Ginger, lemon and thyme
  • Fruit tea and plums
  • Green tea, kaki and lemon
  • Black tea, Lemon, vanilla pod and cinnamon
  • Green tea and yuzu
  • Water, elderflower and lemon
  • Green tea, rhubarb and lemon
  • Water, strawberries, lemon and mint
  • … you see the list is endless

Things worth knowing about water kefir

  1. Water kefir doesn’t like metal, so use glass and plastic utensils when dealing with the grains (strainer, funnel, jars etc.).
  2. The importance of hygiene in the kitchen, especially when dealing with fermentation shouldn’t be new, but the be safe I mention it again
  3. Pausing to make water kefir. If you want to stop making lemonade for a couple of days or are going on vacation, put your water kefir grains and 10% sugar water (100g sugar for 1l water) in an non-lidded glass jar in the fridge. When you want to restart simply rinse the grains and use them according to the basic recipe.

Gari: Blushing Ginger

Once in a while I need to refill my Japanese pantry and as such I went to my local Asian grocery store. Contrary to the popular belief you don’t need many things for Japanese cooking. Shoyu (soy sauce), sake, mirin (sweet sake), rice vinegar, kombu (seaweed) and if you are not vegan katsuo bushi (bonito flakes) are a good choice.

I don’t buy any convenience products. No teriyaki sauce, no ponzu sauce, instant dashi or similar products. As making them yourself only takes a few minutes, no need to spend the money, but more than that a glimpse on the list of ingredients makes me shiver. They are usually full of additives, flavor enhancer and coloring.

Gari (pickled ginger) or Shin-shoga no Amazu-zuké , that you probably know as a side dish to sushi is no exception. Sushi is so popular that more and more people make it at home, but most of them buy pre-made gari, even though making it is fast, easy and cheap.

All you need for Gari is Young Ginger

In making gari there is one thing mandatory: Young ginger. Young ginger has a mild ginger flavor, is juicier and the flesh is tender compared to matured ginger. The skin is paper-thin and can be scraped off instead of cutting. Young ginger is often sold with parts of the stem that has a red ‘neck’ between the dark green stem and the light yellow root. The season for young ginger in Thailand just started and I already saw the first ones being sold last week.

How does Ginger turn pink?

Gari is available in both colors: yellow and pink. Both types are made with young ginger. The blushing pink develops naturally, if:

  1. The young ginger contains enough red pigments, meaning enough red ‘necks attached to the root AND
  2. Either the ginger or the amazu (sweet and sour sauce) is hot when they are combined to activate the pigmentation

Recipe for 1 jar Gari

350 g   young ginger
1          clean glass jar

Amazu (sweet-sour sauce):
– 500ml    rice vinegar
– 7 Tbsp.   caster sugar
– ½ tsp.   salt
– ca. 5×10 cm   kombu (dried seeweed)

Method

Amazu

Combine rice vinegar, caster sugar, salt and kombu and let them sit of a minimum of 30 minutes. The kombu will soften, give off its umami and melow the acidity of the rice vinegar. I like to use a non-reactivepan for that (lined with teflon or enamel) so that the vinegar and will not get a chance to react with the metal of the pan.

After the soaking heat on medium heat and stir until the sugar and the salt dissolved.

Preparation of the ginger

Scrape off the peel with a spoon or the back of a knife and cut the ginger in paper thin slices. Bring a pot with 1,5-2 l Water to a ruling boil and add the ginger. let it boil for 60 seconds after the water has come back to a boil before you strain it through a sieve.

Pickling the Ginger

Put the hot ginger immediately into the glass jar and fill it up with the amazu. Close the lid and let the ginger pickle in the fridge. If you have enough red pigmentation, the first signs of color will show after about 3-4 hours and the final result will be visible after about 48 hours.

The coloring will be a subtle, light pink. So don’t be disappointed if you don’t get that bright pink that you see in the supermarkets, which is the result of artificial coloring. The color by the way has no influence on the taste. So even if you have yellow gari it will be as tasty.

How much Japan can you get in one sentence?

A little black book caught my eye the other day in a little book store in Berlin. ‘A Cup of Sake Beneath the Cherry Trees’. How much more Japan can you get into one title? The author is a Japanese Buddhist monk named Yoshida Kenkō who has lived more than 700 years ago (1284 – 1350).

His collection of 243 short essays Tsurezuregusa (‘Essays in Idleness’) are among he most studied works of Japanese literature. “An eccentric, sedate and gemlike assemblage of his thoughts on life, death, weather, manners, aesthetics, nature, drinking, conversational bores, sex, house design, the beauties of understatement and imperfection. “ (Source: smithsonianmag.com)

When the days get shorter and nighttime falls earlier every day, it is a good time for me to immerse into the thoughts of the past, into the thoughts of a far away world, into the thoughts of someone from the past which, I have never met.

Maybe – or most likely it will not only be only one glass, even though the essay is a short one. The Sohomare Junmai Daiginjo is simply too inviting. Brewed from the best Yamadanishiki rice, harvested in the Premium A area of Hyogo prefecture it is handmade using the ancient Kimoto method.

Soft and slightly creamy on the palate with an elegant aroma I recommend drinking it from a Burgundy glass. Drink it as it is or with a bit of goats cheese  as a nibble while reading. If you want to pair it with food, I would go for charcoal-grilled fillet, chūtoro (medium fatty tuna) or ōtoro (fatty tuna).

I wish you a pleasurable weekend!

Sake essentials in one day : Germany’s first WSET Level 1 in Sake

I am very much looking forward to celebrate World Sake Day (October 01, 2017) teaching Germany’s first WSET Level 1 in Sake in Munich!

Logo Weininstitut MünchenIn collaboration with the Weininstitut München, I will take sake enthusiasts and people new to the world of sake on a one-day journey into the world of Japanese sake.


This time the course will be held in German. Therefore please head over to the German section of this blog for more information.


Summer days dried eggplants

The far away sound of crickets is riding on the cool breeze that is coming in from the window next to me. A welcoming refreshing sign of the upcoming fall. I like fall. The golden colors, the rich crops and the turning leaves. I like to watch kids jumping through piles of leaves and joyfully throwing them high in the air. I like the silky touch of shiny, dark-brown chestnuts and the coziness that slowly enters the homes.

French postcard-like harbor romanticI do look forward to fall, even though I know how much I will miss those long lazy summer days. Days where my girl’s laughter fill the backyard way past sunset, when back-to-school is still far away. Happy-go-lucky days with normal life being on hold. Maybe not always voluntarily, but on hold – for a few weeks only. Living the days without any plans, enjoying the moment. Doing things just because.

French summer feeling: A scooter as bright blue as the sea

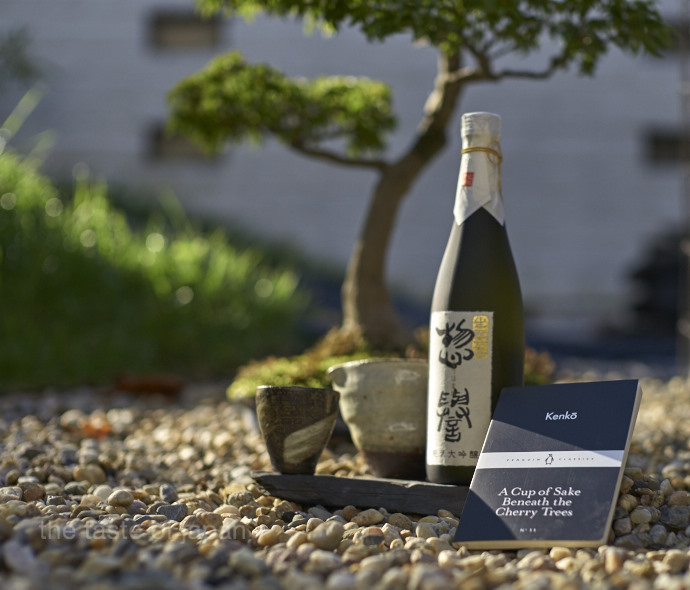
For many years now we spend this short period of time in Southern France. Far away from the tourists that populate the area at that time of the year we spend sunny days between lavender and plane trees. We play hide and seek in a box tree-labyrinth and pick grapes from the side of the path behind our home.

Picnic of the locals at Gruissan harbor
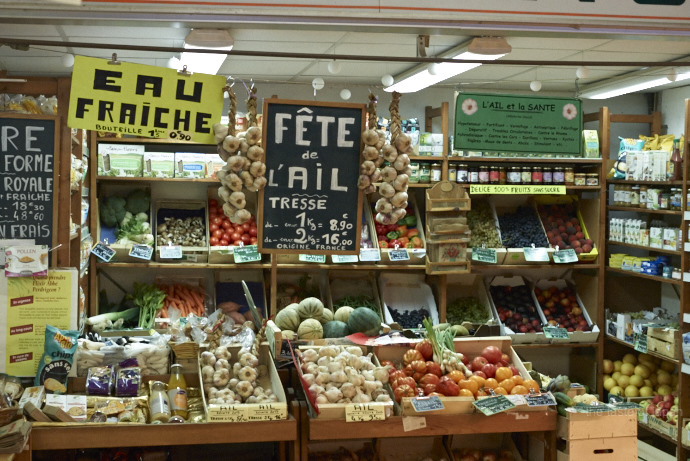
We strive through the nearby harbors and local markets and get inspired by the opulence of colors that pile up appetizingly on each stall, begging us to take them home.

Impressive Entrance to the Narbonne marketBaskets full of oysters and seafood

Vegetables piling up at the market

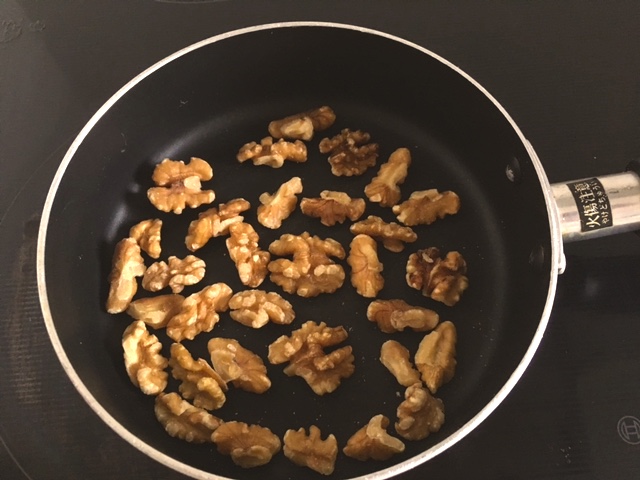
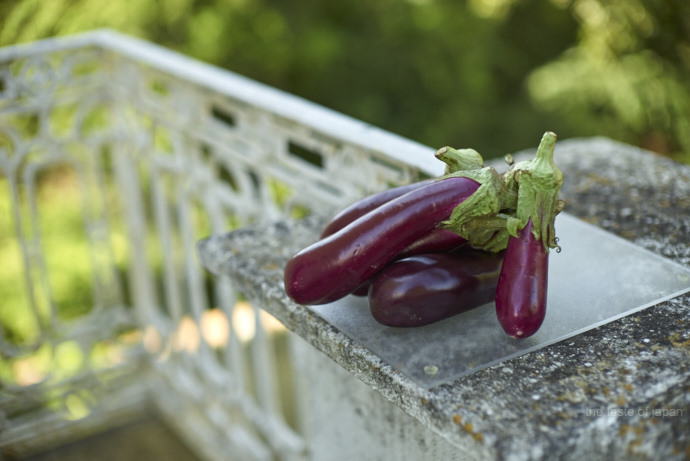
My time is the early afternoon. While the ‘big’ girls play full-throated in the garden I sit next to the open window and listen to the regular breathing of my youngest one taking her nap, regenerating to be able to keep up with the other two until nightfall – or mommy – will force them to stop. Last year I used those moments to make umé boshi (pickled plums). This year I am capturing the summer making sun dried eggplants. Given the intensity of the sun in Southern France at this time of the year and the abundance of fresh eggplants an easy project, promising exciting kitchen experiments in the colder months to come.

Like all Kambutsu (dried products) sun-dried eggplants need to be reconstituted in water before they can be used. When using untreated eggplants the water can serve as a stock (dashi) for further cooking or as a soup. Especially Japan’s temple cuisine (shojin ryori) uses such vegan dashi (e.g. also shiitake-dashi, kampyo-dashi, kombu-dashi) from a single ingredient as well as a mix of different dashis .I must admit this is my first time to experiment with sun-dried eggplants. It might be an old fashioned way of preserving food but maybe it is because of this I am looking forward to give it a try.

Recipe for Hoshinasu (dried eggplants)

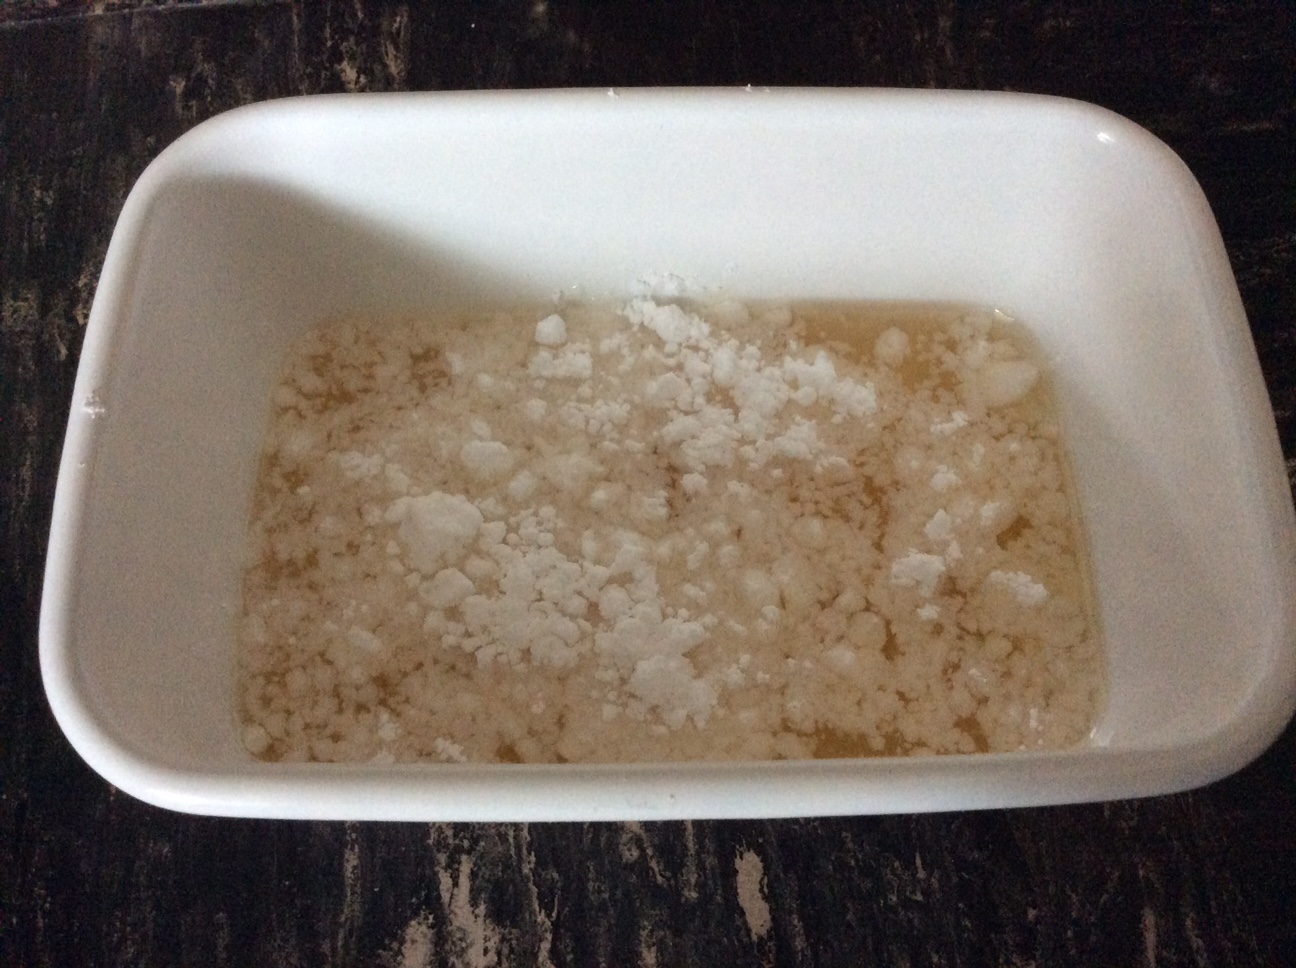
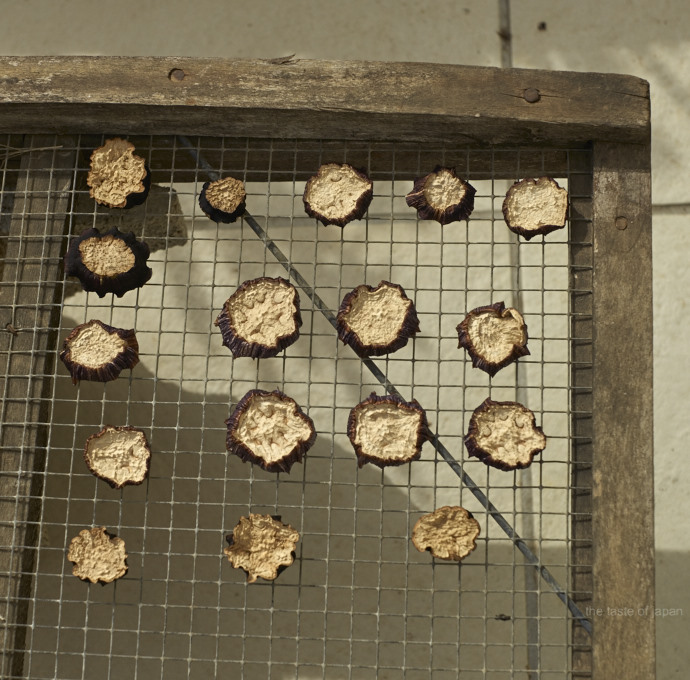
Take a few eggplants (however many you like), wipe the surface with a damp cloth and cut them to your liking. As you can see I made two varieties: Thin strips and chunks.

Eggplants cut into chunks

Auberginen in Julienne
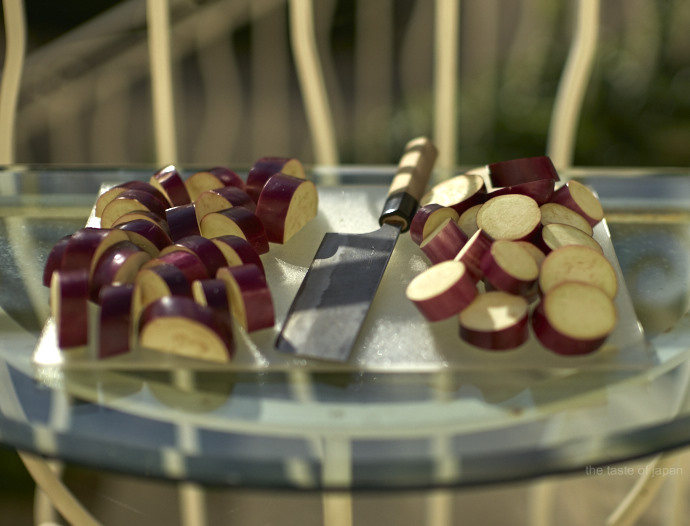
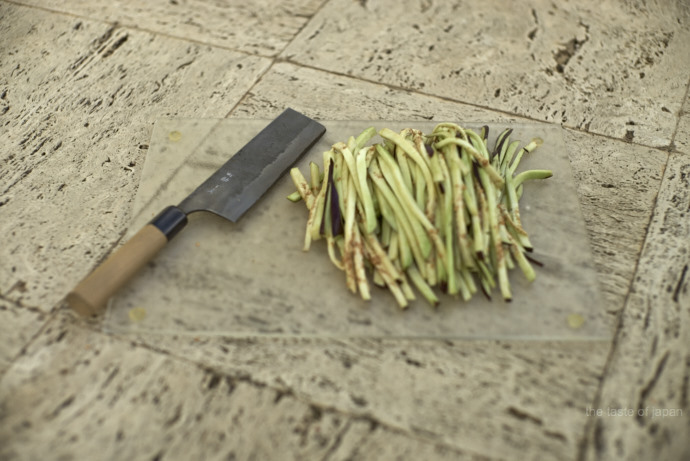
I decided for two widely different cuts to have more options when using them later. Lay the pieces out in the sun on a bamboo basket, rack or any other flat aerated tool (mine was formerly used commercially to dry prunes). The eggplants should not get wet. Neither in the rain nor with the humidity at night. Take them inside if necessary or cover them with a clean cloth, ensuring aeration throughout the entire time to avoid mold.

Drying eggplants A net is protecting my eggplants against hungry birds
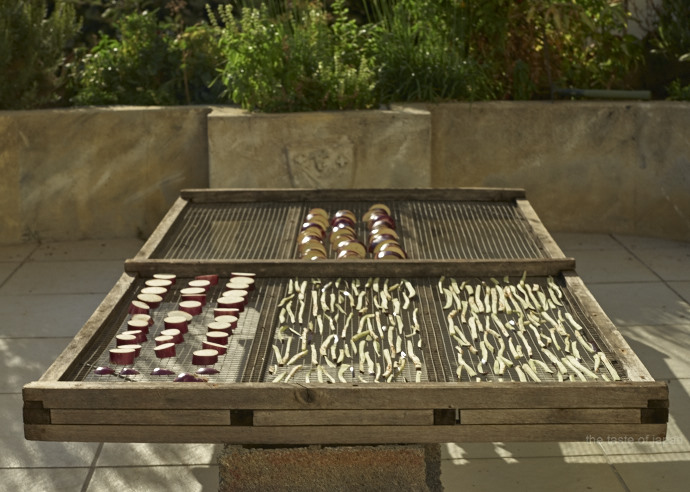
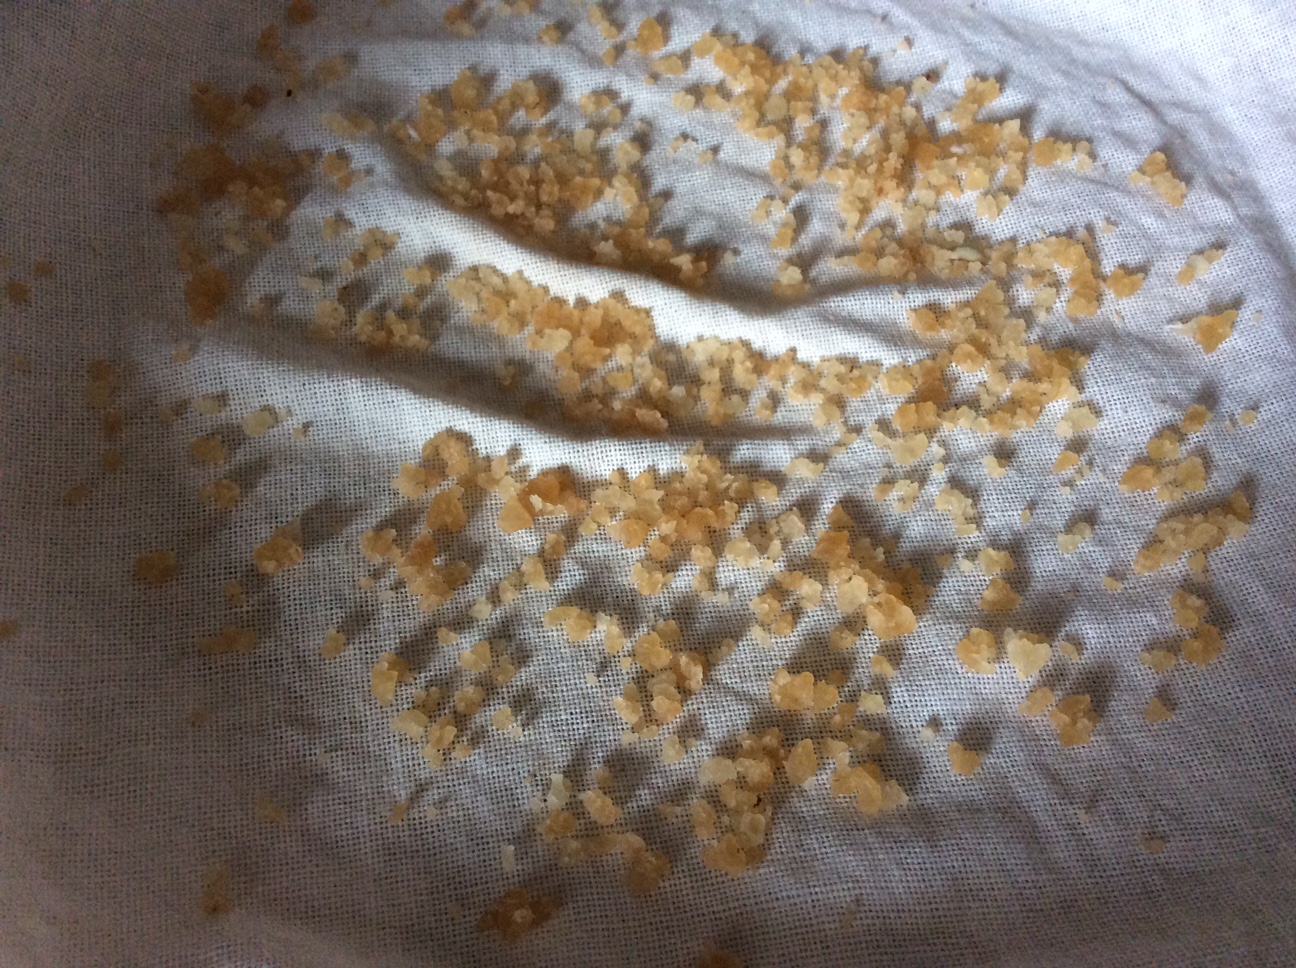
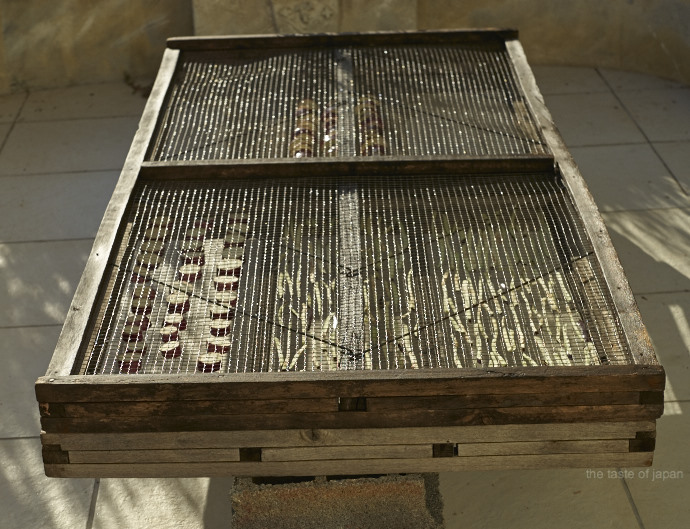
The eggplants are done when they are hard to the touch. The time varies depending on the thickness of your cuts as well as the temperature and humidity. My chunks took a good three days and nights and the julienne were done within two days.

Eggplants finished drying

Blog event on pickling, preserving and fermenting

It all started while I was flicking through my old Japanese cookbooks. The granny-style ones where the pictures of the authors remind me of the old yellowed pictures of me as a kid, where my grandma had a similar haircut. I was looking for an inspiration what recipe would be a good idea to share in Anika’s blog roll. ‚Vergissmeinnicht-Rezepte einer Floristin’ is Anika’s blog which she started to preserve the old family recipes. That’s why her blog translates to forget-me-not, recipes of a florist, combining her education as a florist with her passion as a cook. With ‚Kulinarisch auf Vorrat’ – which translates into culinary preserving – she asked 15 bloggers to share their recipes for pickling, preserving and fermenting. A wonderful potpourri of ideas how to capture the summer before it disbands for this year.

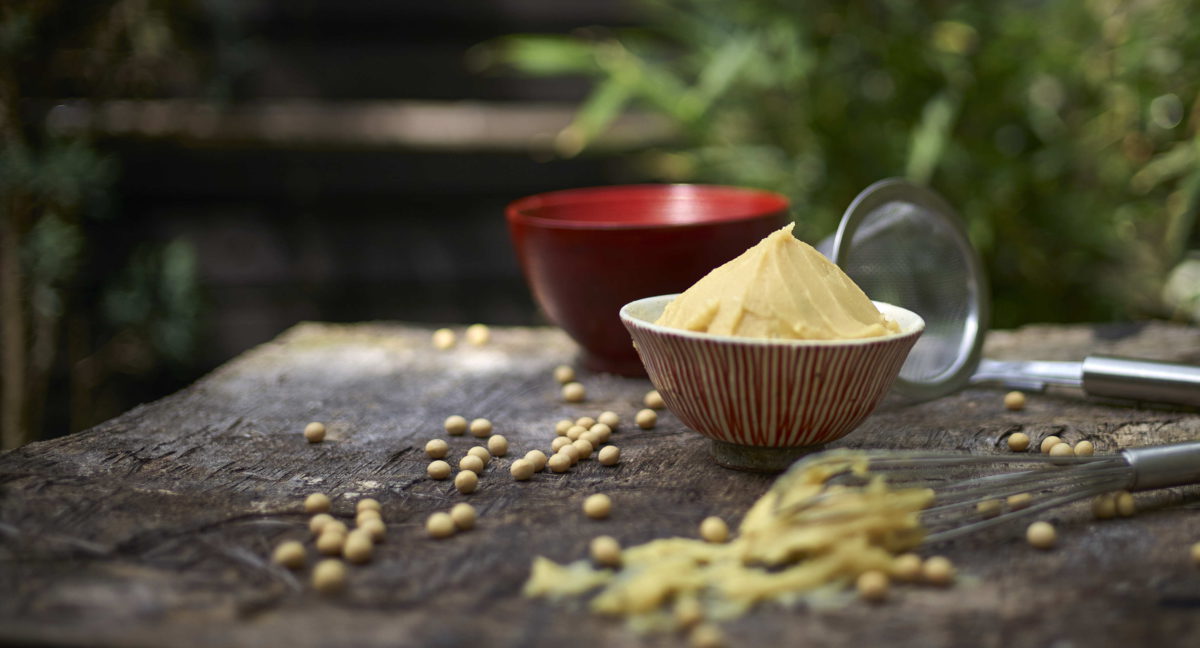
When I got the email that it would be nice to chip in a tsukémono-recipe, I didn’t need to think twice. Tsukémono is definitely one of my soft spots. Ever since my first encounter with Elizabeth’s nuka-pot, I am fascinated by the way the Japanese way of preserving, pickling and fermenting. Soon afterwards a nuka-pot became a member of our family and travels with us wherever we go. My girl’s eyes spark in delight when I serve them takuan (giant radish pickled in nuka for several months). If I top this with a bit of Yukari infused rice (dried shiso leaves from making umé boshi) and a miso soup I instantly have three happy girls.

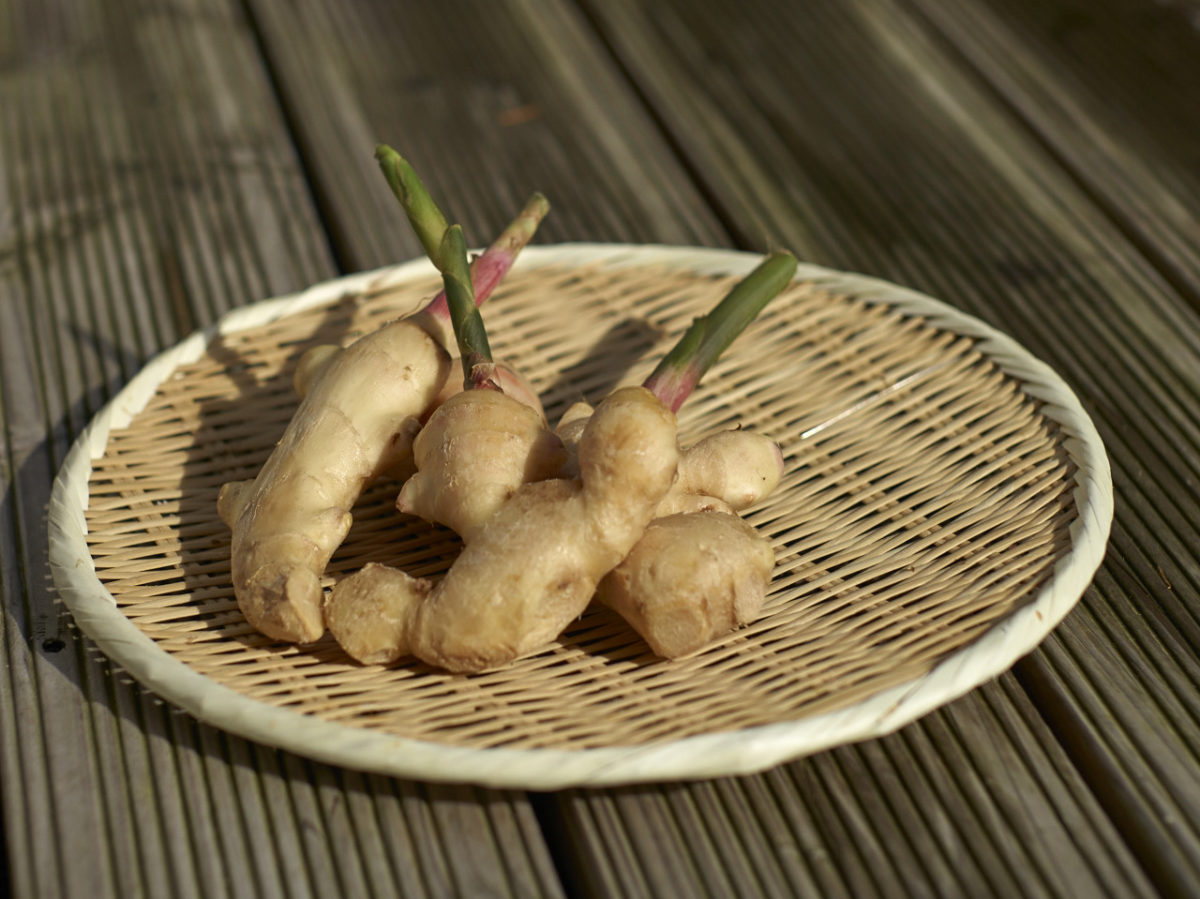
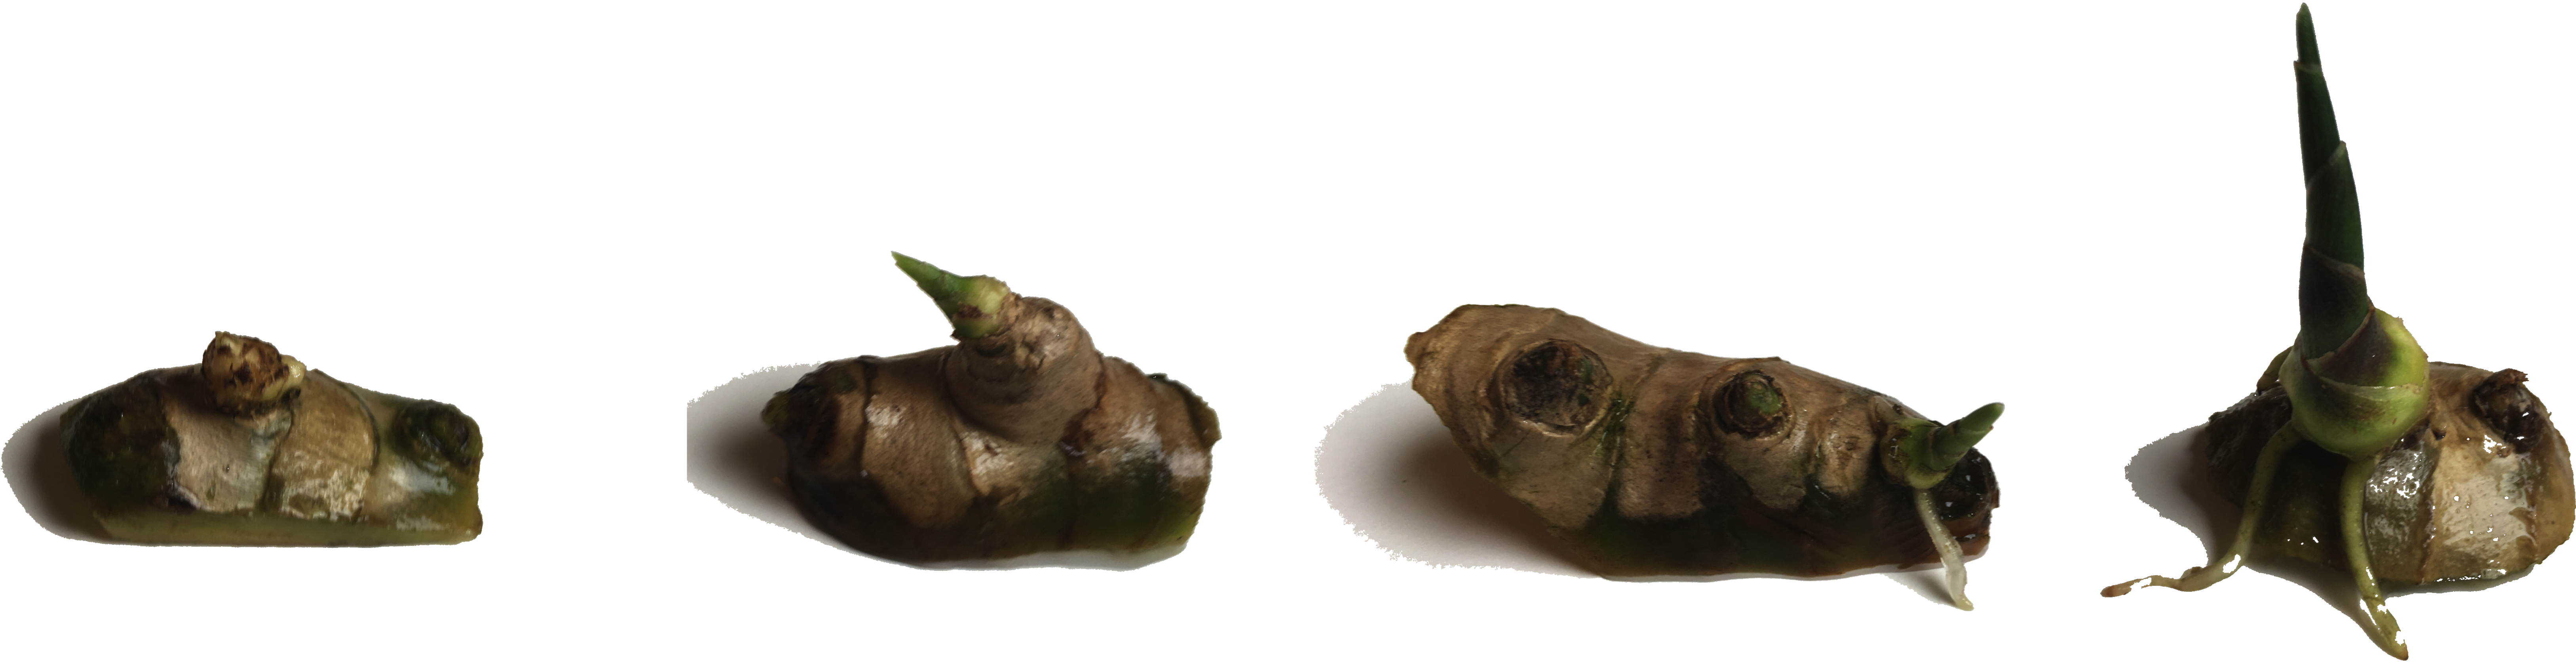
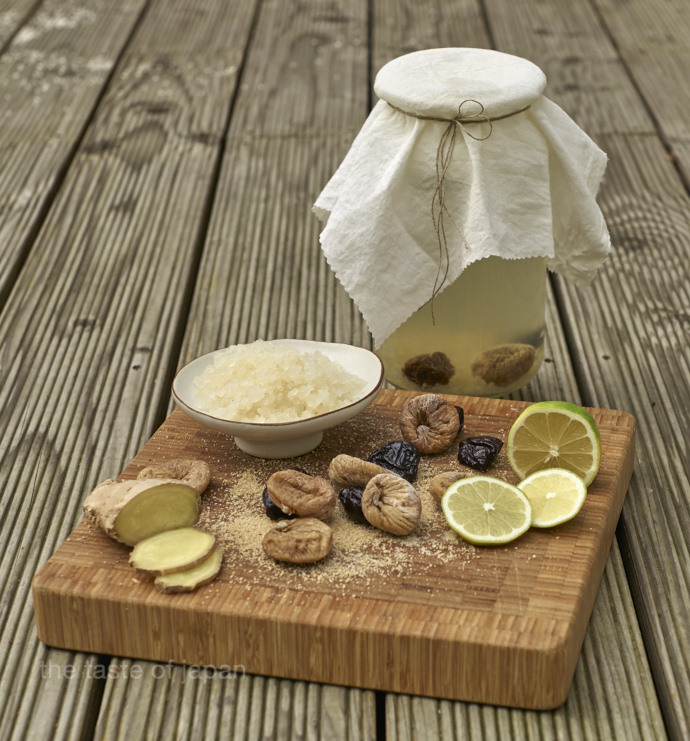
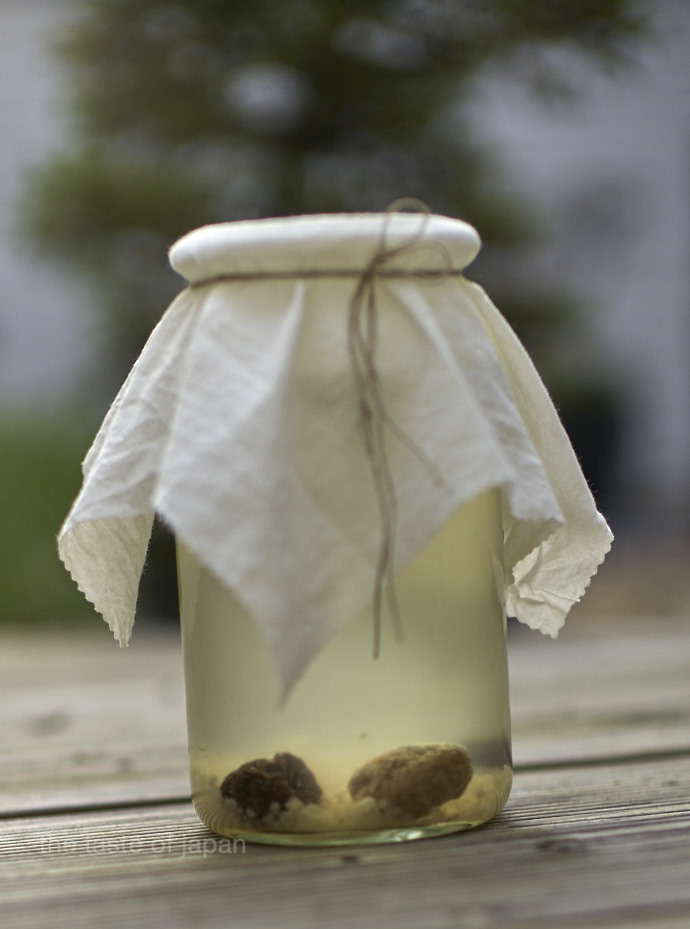
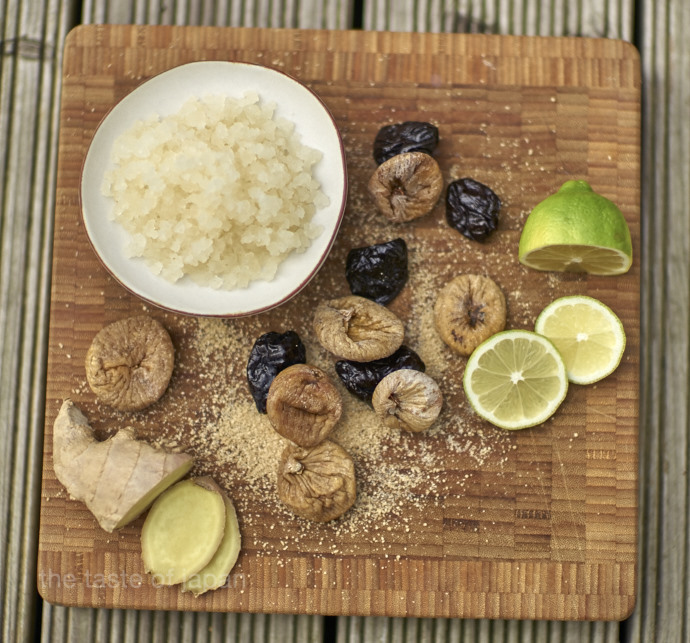
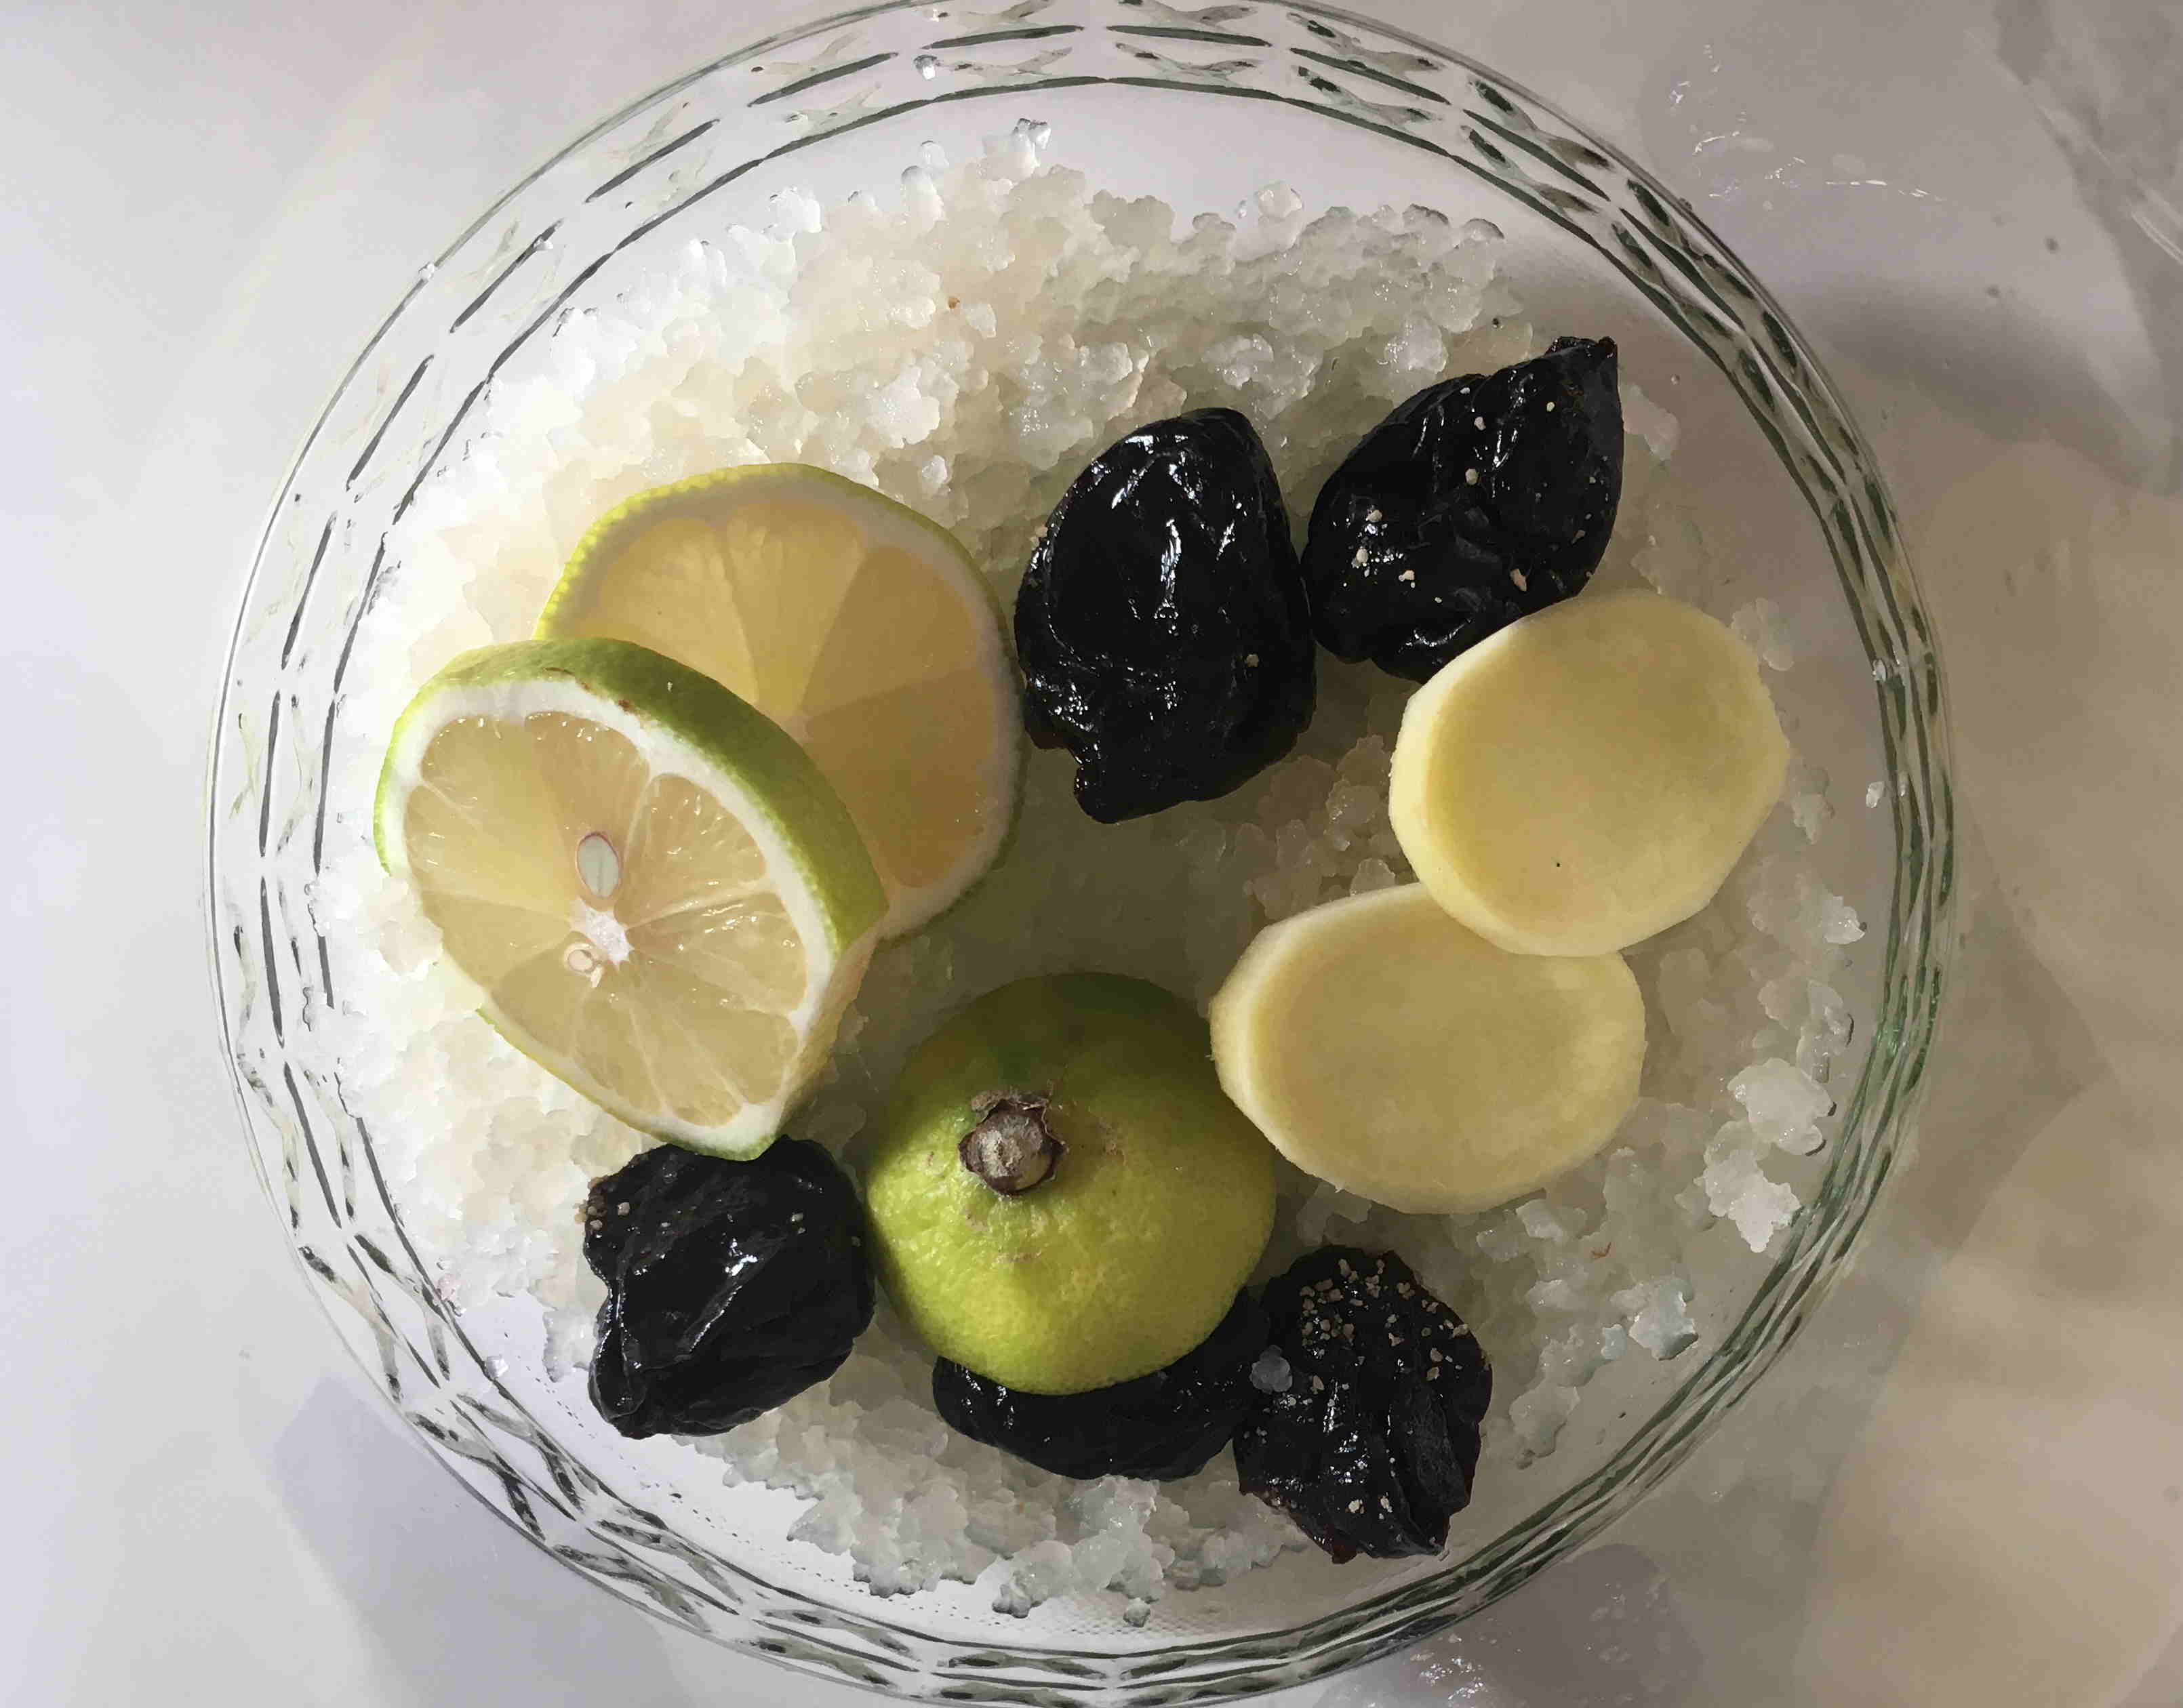
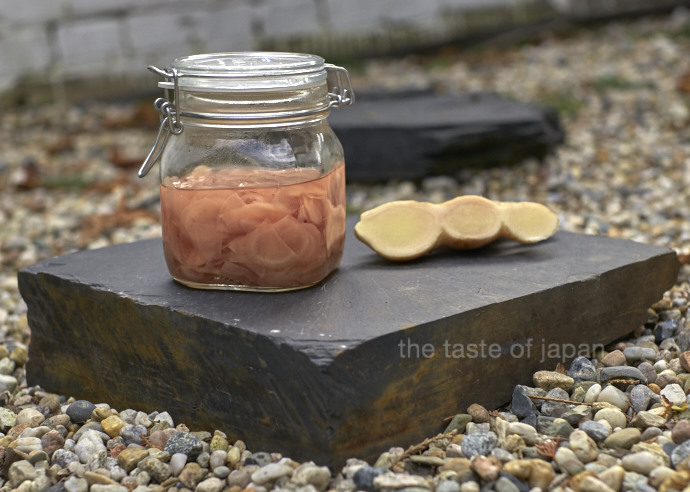
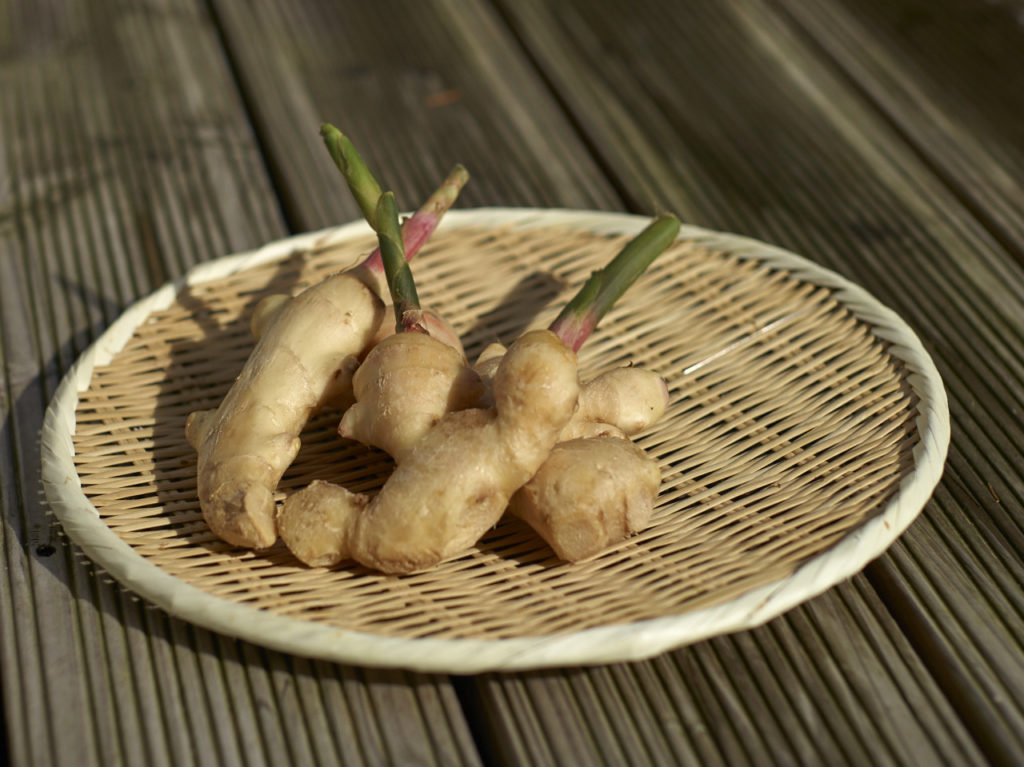
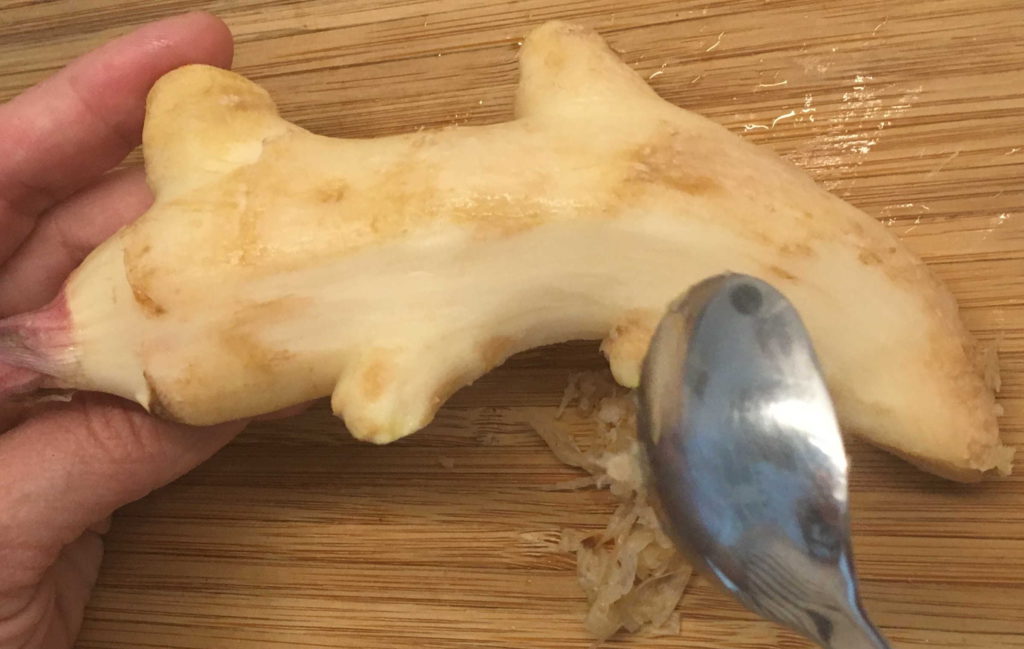
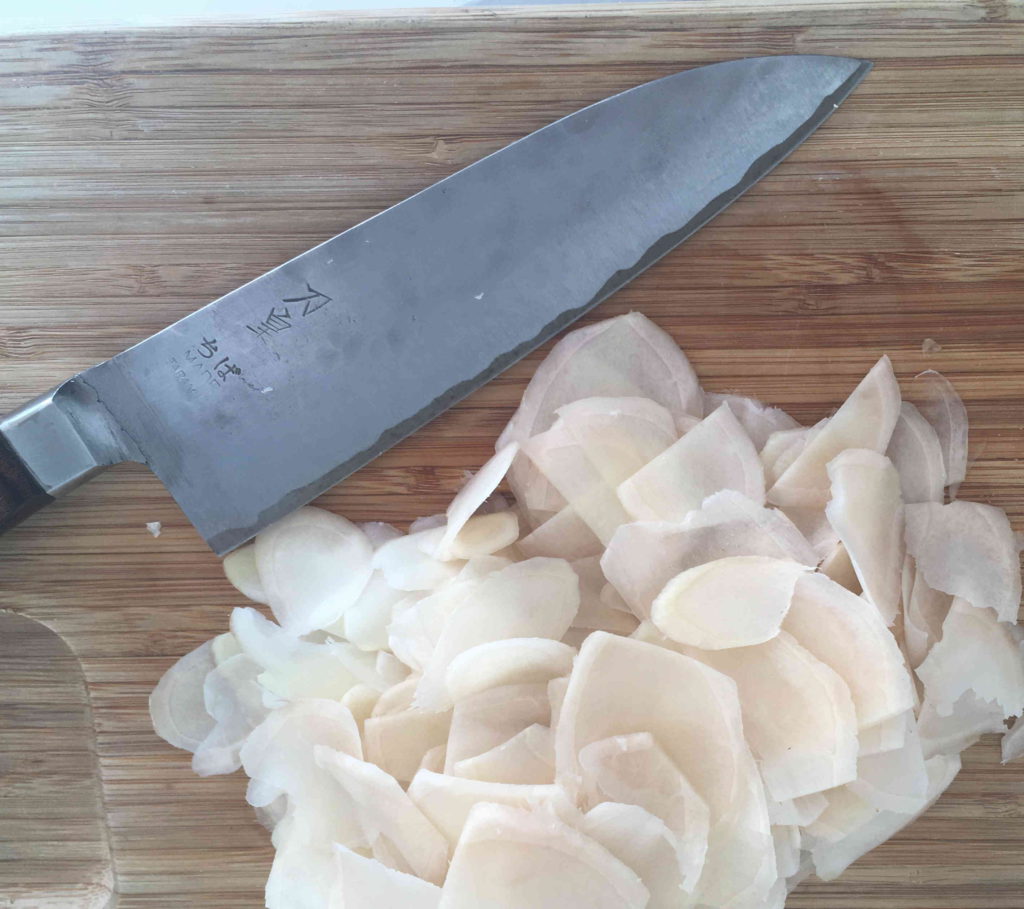
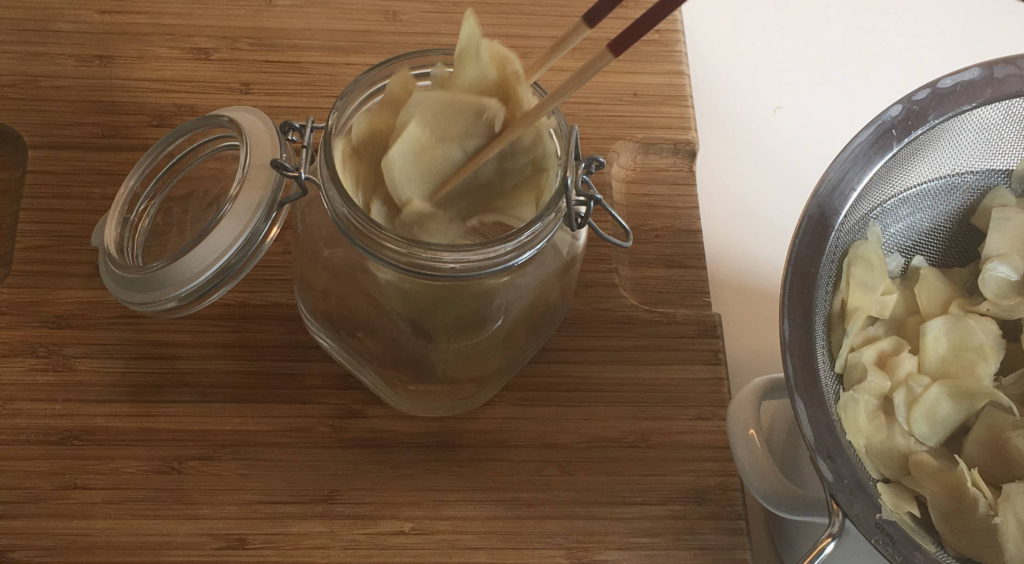
For the blogevent I decided in favor of a classic pickle recipe. Sun-dried eggplants would be far too easy, plus the German summer this year would make it next to impossible. Takuan is pretty advanced, but more than that it cannot be done in small portions, so not really suitable either. In the end I decided in favor for an all-time-classic: Gari (pickled ginger).

Stay tuned for instructions on what you need to do to get pink ginger without any additives and color enhancements.