Green Beans with Walnut Miso

One way to change from slumber to wide awake is stepping barefoot on a Lego brick. I assume an experience that all parents somehow share. Sooner or later they will get you – or your foot. These days at our home those evil Lego bricks collude with walnut shells. Lucky me! While still deciding which one hurts more, my patience not to curse full-throated through our home gets tested almost every day.

What is left from our big pile of walnuts

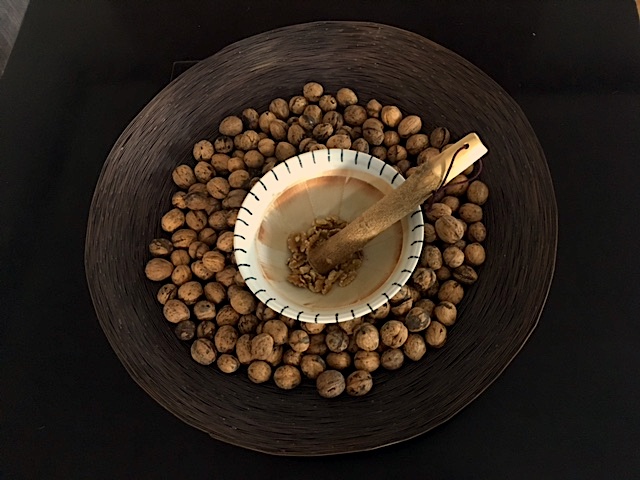
On our family vacation we collected this huge bag walnuts from the garden and I never expected them to be that popular among my girls. Even more so I was surprised about their speed in using the nutcracker, which kind of explains the shells all over our living room. But those nuts are magic. They turn tired, cranky and hungry little monsters that come home fighting after a long day of school and kindergarten into a cheerful little gang collaborating in cracking and eating those nuts.

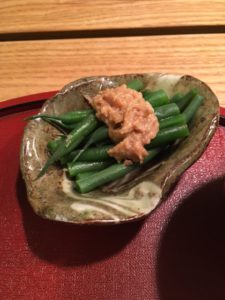
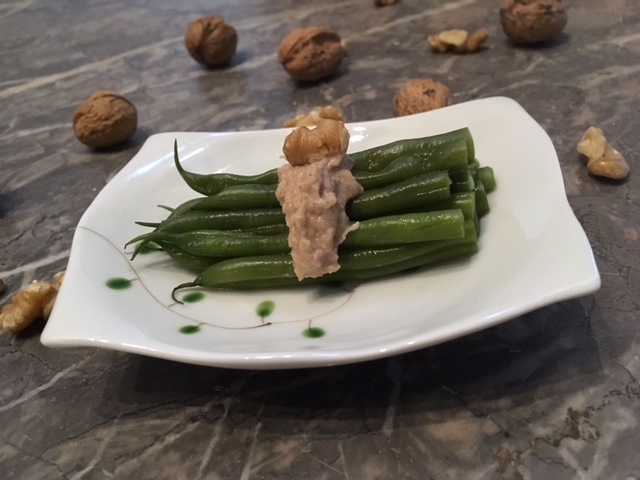
Who am I to change this dynamic, although I actually planed a different use for the walnuts: I wanted to make a batch of walnut miso sauce, which is one of my favorite addition to blanched green beans (and always good to have in your fridge for when you are running out of time). But its use is far from being limited to that. I can think of many vegetables that would benefit from being topped with walnut miso sauce and I even like it a s a dip. So before they are all gone, I grabbed a few handful for tonights dinner.

Recipe for Green beans in Walnut Miso sauce

Serves 6

  • 300g green beans
  • 150ml (Kombu) dashi
  • Splash of soy sauce and mirin
  • Splash of mirin (sweet sake)
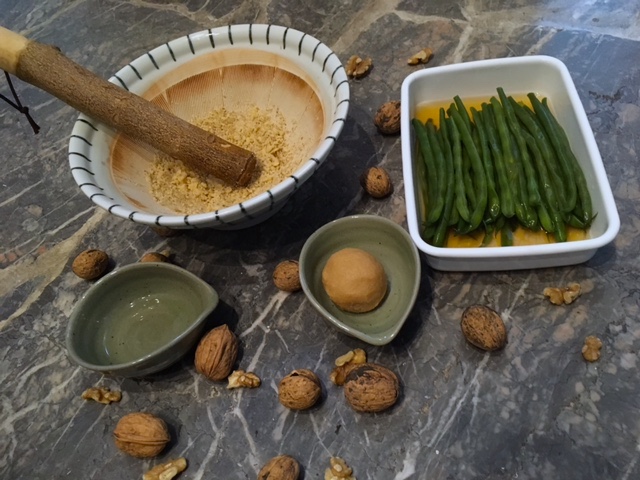
  • 80 g shelled walnut
  • A heaped 1  Tbsp.  white, sweet miso
  • 2 tsp. mirin
  • a splash or more  of (kombu) dashi

Method

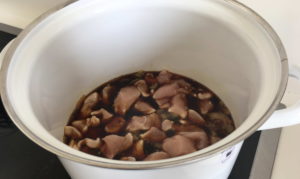
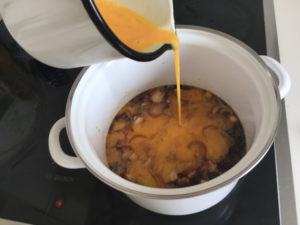
Pour 150 ml (kombu) dashi in a wide container and season it with a splash of soy sauce and mirin .

Green beans waiting in dashi to be plated

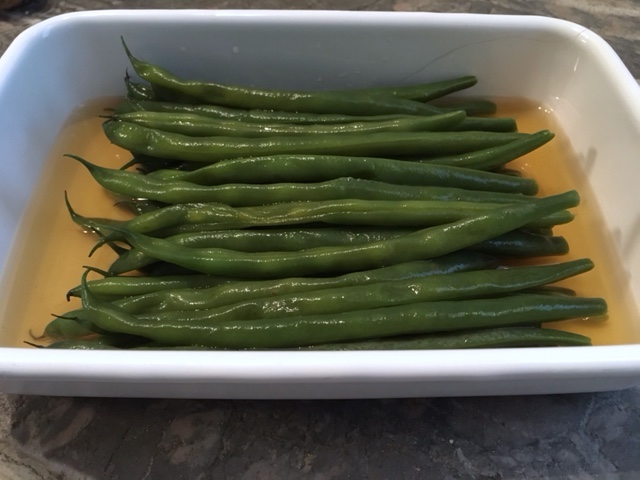
Bring a fairly large pot with water to a rolling boil and blanch the beans until they are tender but still firm (about five minutes after the water has returned to a boil). Drain and DO NOT refresh them in cold water, but put them in the seasoned dashi instead.

Dry-roasting walnuts

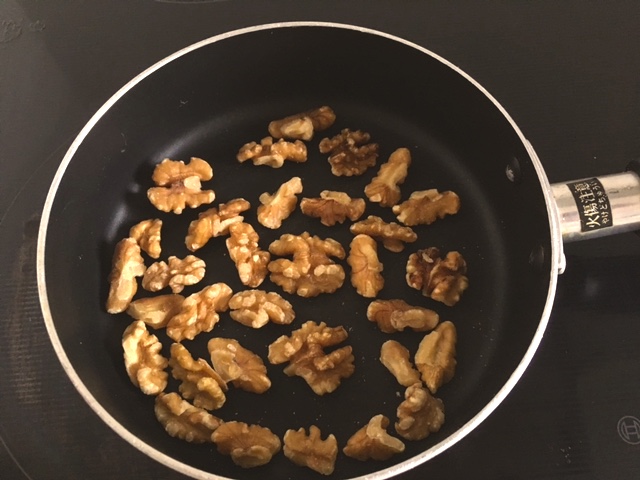
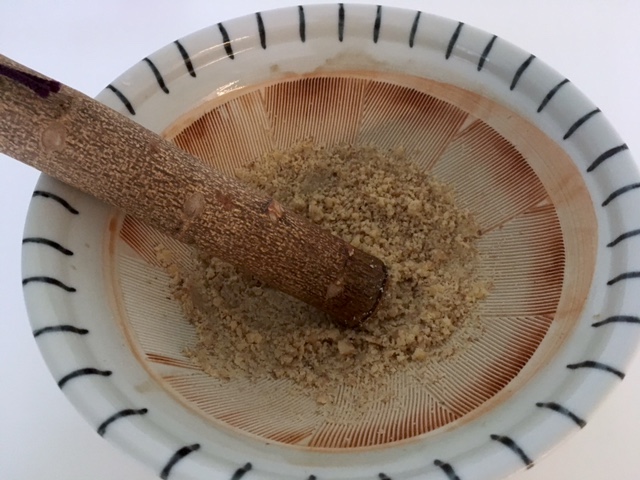
Dry roast the walnuts in a pan over medium heat. Use a suribachi (Japanese mortar) to grind the nuts until they form a paste. If you don’t have a suribachi use a western style mortar and pestle instead. Mix the walnuts with the miso and the mirin and thin it out with (kombu) dashi to your preferred consistency. You may do this in a separate bowl or in the suribachi to avoid any loss.

Crushed walnuts

Take the green beans from the dashi, cut them to your preferred length (depending on your serving style) and arrange them with the walnut miso sauce. You can either coat them by mixing it with the sauce in the suribachi (and use the suribachi as a serving bowl) or serve the green beans on a plate and arrange the sauce on top.

Final Dish: Green beans with walnut miso sauce on top

Tip: You can prepare a lager amount of walnut miso sauce and keep it in the fridge for later use. In this case omit the dashi until you are ready to use it.

Gari: Blushing Ginger

Once in a while I need to refill my Japanese pantry and as such I went to my local Asian grocery store. Contrary to the popular belief you don’t need many things for Japanese cooking. Shoyu (soy sauce), sake, mirin (sweet sake), rice vinegar, kombu (seaweed) and if you are not vegan katsuo bushi (bonito flakes) are a good choice.

I don’t buy any convenience products. No teriyaki sauce, no ponzu sauce, instant dashi or similar products. As making them yourself only takes a few minutes, no need to spend the money, but more than that a glimpse on the list of ingredients makes me shiver. They are usually full of additives, flavor enhancer and coloring.

Gari (pickled ginger) or Shin-shoga no Amazu-zuké , that you probably know as a side dish to sushi is no exception. Sushi is so popular that more and more people make it at home, but most of them buy pre-made gari, even though making it is fast, easy and cheap.

All you need for Gari is Young Ginger

In making gari there is one thing mandatory: Young ginger. Young ginger has a mild ginger flavor, is juicier and the flesh is tender compared to matured ginger. The skin is paper-thin and can be scraped off instead of cutting. Young ginger is often sold with parts of the stem that has a red ‘neck’ between the dark green stem and the light yellow root. The season for young ginger in Thailand just started and I already saw the first ones being sold last week.

How does Ginger turn pink?

Gari is available in both colors: yellow and pink. Both types are made with young ginger. The blushing pink develops naturally, if:

  1. The young ginger contains enough red pigments, meaning enough red ‘necks attached to the root AND
  2. Either the ginger or the amazu (sweet and sour sauce) is hot when they are combined to activate the pigmentation

Recipe for 1 jar Gari

350 g   young ginger
1          clean glass jar

Amazu (sweet-sour sauce):
– 500ml    rice vinegar
– 7 Tbsp.   caster sugar
– ½ tsp.   salt
– ca. 5×10 cm   kombu (dried seeweed)

Method

Amazu

Combine rice vinegar, caster sugar, salt and kombu and let them sit of a minimum of 30 minutes. The kombu will soften, give off its umami and melow the acidity of the rice vinegar. I like to use a non-reactivepan for that (lined with teflon or enamel) so that the vinegar and will not get a chance to react with the metal of the pan.

After the soaking heat on medium heat and stir until the sugar and the salt dissolved.

Preparation of the ginger

Scrape off the peel with a spoon or the back of a knife and cut the ginger in paper thin slices. Bring a pot with 1,5-2 l Water to a ruling boil and add the ginger. let it boil for 60 seconds after the water has come back to a boil before you strain it through a sieve.

Pickling the Ginger

Put the hot ginger immediately into the glass jar and fill it up with the amazu. Close the lid and let the ginger pickle in the fridge. If you have enough red pigmentation, the first signs of color will show after about 3-4 hours and the final result will be visible after about 48 hours.

The coloring will be a subtle, light pink. So don’t be disappointed if you don’t get that bright pink that you see in the supermarkets, which is the result of artificial coloring. The color by the way has no influence on the taste. So even if you have yellow gari it will be as tasty.

Tsukémono: Umeboshi@ home

Their taste is new to most people in the West. Mouth-puckering sour, though pleasant, their saltiness is pronounced but acceptable and make a perfect match for many dishes. At our home umeboshi are often added to onigiri. Those hand pressed rice balls that for some miracle reason taste best if they are made by the hands of one who loves you.

Yukari Onigiri with umé boshi

These days it is easy to buy ready made umeboshi at Asian and organic supermarkets, but nothing beats them being home made. Getting umé, botanically prunus mume or Japanese apricots in Germany is not easy. Until our umé tree yields fruit I am using local apricots instead.

Layered apricots with salt in a glass container
Layer soaked, unbruised apricots with salt in a non-reactive container.

How umeboshi are made

Traditionally umeboshi are being pickled – often but not always with red shiso leaves – in Japan’s rainy season and are left to ferment in their own brine for about six weeks, before they get laid out and dry in the summer sun for three days.

Add weight and patience for the brine to develop and rise and fermentation to happen

What seems easy in Japan with its hot summers is a challenge in Germany. Even more so this year, where summer took a long time coming. But finally the weather forecast predicted a couple of hot days. Perfect timing for my ‘umeboshi’, that will get their finishing touch of summer sun.

Local apricots fermented umeboshi style
‘Umeboshi’ laid out to dry in the summer sun

Want to make umeboshi at home?

This years umeboshi pickling season is over, but if you want to join me in making umeboshi next time, sign up for the newsletter and I will guide you through it step-by-step.

Nuka zuké @ home: What is Nuka zuké?

“A bowl of rice with a small plate of pickles and some soup is not merely food, but cuisine…”

(Michael Ashkenazi, The Essence of Japanese Cuisine)

I remember a sunny early autumn day in Tokyo. The heat and cruel humidity of the summer was finally over when a bunch of people literally from around the world gathered in Elizabeth’s kitchen around a big dark brown earth ware pot, waiting for its secret to be unveiled. ‘Take a whiff ‘ was the invitation to carefully look and smell into the pot.

Turnips coming out of the nukadoko

But no hands, because hygiene is extremely important in keeping a nuka-pickle-pot healthy. Nukadoko (pickling bed) can be passed down for generations and as such the one in front of me was easily some 150+ years old. Given that nukadoko is a living organism that requires constant monitoring and attention, it doesn’t come on a surprise that Elizabeth is very cautious.

My nuka-pots carefully packed for the long trip down south

The only one allowed to touch Elizabeth’s nuka pot besides her is her neighbor that takes care of it whenever she is out of town for a long time. Sounds irritating in the beginning, but after having to throw out nuka-pickle-pots that had gone bad three times, I find myself being as careful and restrictive. I even take my nuka-pickle pot with me on vacation or weekend-trips. Is that absolutely necessary? No. There are ways to maintain your nuka-pickle-pot even though you are not around, but as I have Elizabeth’s 150+ years in mine , I am not going to take chances.

Nuka zuke in France
Making nuka zuke in my holiday home kitchen in Southern France last year

Nuka, Nukadoko and Nuka zuké: What’s the difference?

But before I go on, let me explain a few terms here, so that you don’t get confused:

  • Nuka is the Japanese term for rice bran. In Japan, nothing goes to waste and as such, the nuka that is left after polishing rice (e.g. for table rice, sake making etc.) is used as a pickling medium.
  • Nuka mixed with water salt and aromatics becomes the pickling medium, called nukadoko.
  • The nukadoko is usually kept in a (non-reactive) container, a ‘nuka-pickle-pot’ or nuka-pot and
  • the generic term for vegetables, pickled in nukadoko is nuka zuké.

Nuka zuké ferments vegetables in a couple of hours

Nuka zuké is fairly easy and fast compared to other fermented products, but it needs to be mixed by hand to aerate the nukadoko. Yes, everyday! It only takes a few seconds, but you should be willing to commit to this before you start you own nuka-pot at home. Your reward? Cucumbers turned into crisp, savory pickles over night and tart red radishes get enchanted into exhilarant crudités in a couple of hours.

Nuka zuké: Cucumbers and turnips topped with yukari and shio zuké on the side

Nukodoko thrives off the bacteria that live on your hands and the vegetable’s skin. They also influence the taste as well as the aromatics that you can put in. So each nukadoko has its unique taste that will constantly change. Generally spoken an aged nukadoko will be more round and smooth than a young one, similar to wine, that’s why nukadoko can be passed down the generations.

Nuka zuké contains brown rice nutrients

Nukadoko is made from nuka – rice bran. The vitamin rich outer layers of rice – undoubtedly nutritious and healthy – would create off flavors in sake and are often unwanted for table rice. So one way to get back some of those nutrients that have been milled away is pickling vegetables in nukadoko. Nowadays it is fairly easy to source nuka either in Asian markets or online (e.g. here or here), but you could also substitute nuka with wheat bran. Wheat bran is lighter and more fluffy. When using wheat bran instead of nuka you should use a little more water and make sure that your pack down your ‘wheat bran-doko’ tightly on your vegetables to ensure contact with the bacteria.

Become a tsukémono addict

Ever since that one sunny autumn day in Tokyo when I smelled and tasted nuka zuké for the first time, I am enamored with it. But while a taste of vegetables pickled in nuka can prise the gates to Tsukémono heaven ajar, making it yourself will fling them open and convert you to the delights of preserving the Japanese way.

For those that are interested to learn how to start a nuka-pot and to handle it properly, how to influence its taste and troubleshooting-strategies to avoid it going bad, subscribe to the newsletter to get the information on the next nuka zuké-workshop delivered directly to your inbox.

Tsukemono: Cucumbers pickled with Ginger and Kombu

Today’s recipe is a fast one. And easy. Another example of mottainai – in this case using left over kombu from making dashi. Full-flavored pickled cucumber with an addictive hint of sweetness, illustrating once more that Japanese cuisine per se is neither complicated nor that it needs many ingredients.

Tsukemono ingredients: Pickled cucumbers with kombu and ginger
Tsukemono ingredients: Mirin, soy sauce, rice vinegar, cucumbers cut into 0,5cm rounds, threads of kombu and ginger

The recipe calls for cucumbers that do not have a lot of core, so Lebanese cucumbers are not what you are looking for. Japanese cucumbers are perfect, of course, but even if you don’t have access to real Japanese cucumbers you should be able to find mini-cucumbers in your grocery store, that usually have a better flesh-core ratio.

Recipe for one jar Cucumber-Tsukemono

  • 500g      Cucumbers
  • 2,5 cm   Ginger (peeled)
  • 3-4 pcs. Kombu, left over from making dashi (in threads a small hand full)
  • 180 ml   Soy Sauce
  • 120 ml   Mirin (sweet sake)
  • 60 ml     Rice Vinegar

Method

How to make Tsukemono: Put cucumbers into the cooking liquid

Wash the cucumbers and cut them into 0,5cm rounds. Take the ginger and the kombu and cut them into fine threads. Combine soy sauce, mirin and vinegar in a pot and bring to a boil. Add the cucumbers, ginger and kombu and reboil for a minute. Take the pot off the heat source and let cool (about one hour).

How to make Tsukemono: Stain the cooking liquid if you want to repeat the process
How to make Tsukemono: Strain the cooking liquid before reheating it if you prefer the vegetables to be less crunchy

If you like your pickles to be less crunchy, repeat the process after the pickles have cooled down. In order to do so, strain the liquid and bring to a boil once more. Add the cucumbers, ginger and kombu and reboil for another minute before leaving it to cool again.

Fill pickles with the liquid into a clean glass jar and store in the refrigerator

A Japanese 15-Minute-Meal

A while ago I wrote about ‘one of these days’. Days on which nothing seems to work out or days on which time seems to fly too fast to get everything done – or worse: both. Spending time in the kitchen to prepare your family a healthy, nutritious meal is usually not on top of the list on those days. The focus is more on how to get something quickly on the table that soothes the mind of children, hungry and tired from the day, and switches their mood to ‘satisfied and happy’.

In Japan it is unusual to cook every dish on the same day

Once every week we return home really late. Hungry and tired after a long day that ends with the girl’s swimming lesson. Once at home I only have a few minutes to get dinner on the table, but thanks to the general rhythm in Japanese cuisine this is a doable task. Traditionally a Japanese meal consists of one main dish, two side dishes, a soup and rice. In Japanese referred to as ‘ichi-ju-san-sei’. One-soup-three dishes. An accompanying bowl of rice is not in question, so it is not mentioned. But it is not uncommon that the different dishes are prepared on different days.

Japanese cuisine is extremely seasonal and it is frugal, as you can read in Persimmon Peel Prominence or  The Peak of Flavor or Why Wash Rice?. Nothing goes to waste. Typically you find in a Japanese meal something that is in season as well as something that needed to be prepared, left from cooking other dishes. Skillfully organized, it is possible to get a traditional Japanese meal on the table in 10-15 Minutes. Nutritionally balanced, fresh and yummy.

Ichi-ju-san-sei

As an example I take our dinner from this week’s swimming-day. On the tray you find:

  1. String beans with a walnut-miso-sauce,
  2. pickled cucumber with kombu and ginger as well as some takuan (pickled radish)
  3. tamagoyaki (rolled omelet),
  4. miso soup with carrots, green onion tops and little wheat gluten,
  5. miso marinated salmon and
  6. rice.

Cooking time in total about 1,5-2 hours, but spread over a couple of days. ‘Cooking’ time to get dinner on the table that night: 10-15 minutes. Mainly ‘that long’, because I wanted to serve the salmon still warm and not at room temperature, which is commonly done in Japan. But how is that possible?

A Japanese 15 minute meal

Not a recipe for a single dish, more a recipe for a rhythm in the kitchen that enables you to get a Japanese meal on the table in 15 minute.

Just before dinner time (right after we get home):

Miso preserved the salmon for a few days until I finished it off in a couple of minutes
  • Take the salmon from the marinade and fry it on medium heat, put dashi in a separate pan and bring to a boil
  • While this is happening, take the string beans, miso-sauce, tamagoyaki and pickles out of the fridge and arrange on individual plates
  • Cut carrots and green onions and place them with the (store bought) wheat gluten
    Prep-time for miso soup is basically the time necessary to heat dashi
    Prep-time for miso soup is basically the time necessary to heat dashi

    in the soup bowl (my family doesn’t eat cooked carrots, so they go directly in the bowl)

  • Plate the salmon
  • Take dashi from the heat, add miso and pour into the soup bowl.
  • Fill rice bowl with freshly cooked rice. ‘Itadakimasu’ (Enjoy)!

On the days before our dinner

  1. I cooked the string beans on the day they were bought and stored them in dashi with a dash of soy sauce and a dash of mirin (sake brewed from mochigome – Japanese sweet rice)
  2. I usually rejuvenate miso that lost its aroma and make some kind of neri miso with it (see basic recipe in What can you do with ‘old’ Miso?) and as such I had a walnut-miso-sauce waiting in my fridge that I made a while ago (probably a week or so).

    The string beans were cooked and stored in dash the day they were bought
    The string beans were cooked and stored in dash the day they were bought
  3. I always make pickles when I come across good looking vegetables at a reasonable price or whenever ‘it is time’ to do something with what I have on hand (like I use left-over kombu) or make persimmon vinegar ). In this case I came across really fresh mini-cucumbers about a week ago, which I like in particular, because they are the closest to Japanese cucumbers that you can get around here. At the same time I had quite an amount of left-over kombu from making dashi. So I pickled them together with ginger, soy, mirin and vinegar.
  4. The day before our dinner I made Tamagoyaki and whenever I do this I usually make a few omelets. In theory the keep a couple of days in the fridge, but in our home the ‘magically’ disappear quickly….

    I always have pickles in my fridge that can be pulled out any given time to enhance a meal
    I always have pickles in my fridge that can be pulled out any given time to enhance a meal
  5. In my kitchen dashi for miso soup is basic layout and I always have some in the fridge. Similar I always have a jar of kombu sitting in water on my kitchen counter so I can make new dashi in a couple of minutes (see recipe). As such making miso soup (see recipe here) is a piece of cake.
  6. The salmon also went in the miso on the weekend before (here is the recipe). Whenever I get my hands on really fresh fish I get a bit more and put it in miso, because it is yummy and because with three kids, a job and a household to manage I can pretty much rely on ‘those days’ to happen. By the way: the technique of preserving fish in miso is an old one and has been invented long before there was refrigeration. So don’t be shy. Give it a try!
  7. I did not prepare the rice days before. I prepared it in the morning (read here what you need to do and why) and put it in the rice cooker who did the cooking automatically at the time set and we had freshly cooked rice when we got home.

And what are we going to have today? I am not sure yet. There are still some string beans sitting in dashi that could go well with dry roasted katsuo bushi (bonito flakes) and some soy sauce as well as a piece of silken tofu that would make a perfect match as shira aé (tofu sauce) to some of the loquats that I came across the other day and I also have an eggplant that should be used. I could simmer it in neri miso and dashi and finish it off with some roasted sesame seeds. With some rice, a soup and some of the pickles in my fridge we should be set for tonight. Prep time: probably something around 30 minutes…

Gohan飯: How to cook Japanese Rice

Truth to be told, our home is often chaotic. Our girls speed through our home and our life boosting with energy, laughter and all sorts of ideas. Naturally this is not just a recipe for love and understanding between the siblings, it also has quite a potential for conflicts… But when it comes to my question what they would like to have for dinner they shout out “rice” in perfect harmony. If they would get to choose they would always have rice, even for breakfast. No need for me to test the waters with ‘classic European kid’s dishes’ like Spaghetti with ‘red sauce’. None of our kids would touch them.

Gohan means rice and meal

The taste of freshly cooked rice is truly delicious and I can think of no Japanese person who would disagree with that. But rice is not just a side dish. ‘Gohan’, the Japanese word for rice also means meal and as such it represents the significance of rice in Japan where it is always put onto the ‘place of honor’ (the lower left) in the traditional meal setting.

IMG_1410
Ichi-ju-san-sei: A traditional Japanese meal consisting of one (ichi) soup (ju), three (san) dishes (sei) and rice

Onigiri instead of sandwich

Serving my girl’s preference for rice, they usually find Onigiri, also referred to as Omusubi, in their lunchbox. Onigiri are small pressed rice ‘balls’, typically in the shape of a triangle with different seasonings and fillings. Small, affordable and convenient to take with you as an instant, delicious way to satisfy your hunger.

Yukari Onigiri with umé boshi
Onigiri with umé boshi (pickled plum)

In Japan Onigiri are practically sold on each corner, whether in a convenience store or dedicated stalls. Like their Japanese peers, my girls were started on Onigiri as a baby, which probably explains their food preference. Outside of Japan there isn’t the luxury of getting an Onigiri on the way, but given that it is healthy, delicious and convenient, it is worthwhile making them yourself. But before we start with how to make Onigiri we have to start with how to cook proper rice.

Cooking Japanese Rice

Generally speaking you can cook rice on a stove or with a rice cooker. I know that I could go into more detail about the type of pots and the type of heat sources, but that would take me too far.

Using a rice cooker with a warmer feature has the advantage of cooking rice independent from when you need it. Wonderful fur busy people or late riser that don’t want to miss out on freshly cooked rice in the morning e.g. to make Onigiri. Not speaking of being a regular life saver for me in getting a meal on the table in less than 10 minutes (see recipe here).

Using a rice cooker is pretty straight forward, but for those who prefer a step-by-step guide for its use I recommend an article that Daniela from NipponInsider wrote on it (in German only). In that article she also took a closer look at the different technical features of today’s rice cookers, so if you consider buying one and can understand German, hop over and have a look.

As convenient as rice cookers are, rice can be cooked equally to perfection on a stove, which I will introduce to you in detail below.

Things worth knowing when cooking Japanese Rice

Independent from your method of preparation, when it comes to Japanese rice there are a few things to keep in mind:

  1. Wash the rice thoroughly
    The objective is to remove any dirt, but even more the ‘nuka’ (rice bran) that would cause the rice to become mushy.

    Washing Rice
    Japanese rice needs to be washed thoroughly before cooking. The starchy water is called togi jiru and has many culinary and non-culinary uses

    In order to do so wash the rice in a bowl with cold water, gently rubbing the grains against your palms or the side of the bowl. Change the water and wash again. Repeat until the water runs clear. Drain the rice in strainer.
    The cloudy water that you get not just has a name (‘togi jiru’), it also has various culinary and non-culinary uses. Check them out here, before you throw it out.

  2. Regulate humidity of the grains
    Rice expands when absorbing water, but not uniformity.

    Dried Rice
    Let the rice sit for a while after washing to help regulate moisture content and avoid cracking

    Some parts of the grains absorb water faster than others and as such fast changes in humidity and temperature lead to cracked rice grains, which then would get mushy in the cooking process. To avoid cracks you should

    Soaking Rice
    Soaking rice additional 10-15 minutes before cooking also prevents cracking

    a) let the rice sit in the strainer for about 30 Minutes after washing and afterwards
    b) let the rice sit for another 10-15 Minutes in the water of the rice cooker or the pot before turning on the heat.

Recipe for 2 cups cooked Japanese Rice

Ingredients

  • 1 cup (200ml)  Japanese rice
  • 220 ml             Water

Method

An important matter upfront: Even though you might be tempted, do not lift the lid until the full cooking process is completed (I jut did it to get you the pictures)!!!

Place the washed and soaked rice with the water in a heavy (2-3l)-pot and Cooking Ricea closed lid on the stove and bring it to a boil on high heat. You can easily hear the water boiling and usually the lid starts to move as well.

Reduce the heat to medium and let the rice absorb the water completely. This takes about 5 minutes and even though you might think that this is hard to notice without peaking into the pot, rely on your ears. You will hear a fizzling sound that indicates the full absorbance. Steaming RiceNow put your rice again on high heat, but only for a moment (about 30 seconds), before you take it off the stove and have it self-steam for another 10 to 15 minutes. Do not omit the self-steaming. It is important for the texture.

Fluff your rice with a shamoji (Japanese Rice paddle), serve and enjoy! And as we are all set now to start with how to make Onigiri, subscribe to our newsletter to make sure not to miss a recipe.

Oyakodon 親子丼: Chicken and Egg on Rice

It has been quite a while since I packed all my belongings in a dark blue Golf and left to move into my first apartment – some 630 km away from home. Until then it was always my mom, who had decorated the house for Easter and encouraged us to help paint the eggs that she prepared. Now I am a mom myself, but having lived in non-Christian countries for the past decade I have not blown an egg for my kids so far. Until my oldest came home from school last week. Excited that she is supposed to bring a box of blown eggs.

With so many eggs and some chicken we still had in the fridge we decided to make Oyako-Donburi (rice bowl with chicken and egg – in short: Oyakodon) for dinner. An easy, fast and satisfying meal.

Iain Ingredients for Oyakudon (without sake and mirin)
Main Ingredients for Oyakodon (without Sake and Mirin)

Donburi is a popular dish in Japan. Actually Donburi means bowl, but it refers to a bowl of rice with a topping on it. The most popular donburis at our home are Gyudon (beef), Maguro (tuna) and Oyakodon. Means ‘mother and child’-rice bowl and is made from braised chicken, eggs and onions.

Recipe for 2 big Bowls

Ingredients

  • 3 cups (á 200ml) Japanese rice
  • 200g      Chicken breast (in bite-size pieces)
  • 1              Onion (sliced or cut into narrow wedges)
  • 4                 Eggs
  • 100ml     Dashi
  • 30 ml     Soy Sauce
  • 15 ml      Mirin
  • 15 ml      Sake
  • 1 Tbsp.   Sugar
  • 2 Tbsp.   Roughly chopped Mitsuba (Japanese Parsley) or finely cut chives
  • A dash   Shichimi (Japanese chilli powder) – optional

Method

Wash the rice thoroughly and cook it in a rice cooker or on the stove. When the rice is done cooking, take a big spoon or a Shamoji (a rice paddle made from wood or plastic) and quickly loosen up the rice. Close the lid and let it steam while you prepare the topping.

Oyakodon: Simmering Chicken and Onions

Whisk the eggs without incorporating too much air to save the silky texture. Pour soy sauce, dashi, sake and sugar in a pan and bring to a simmer. Add the onions and the chicken and cook until the chicken is almost cooked through (approx. 3 min., depending on the size).

Oyakodon: Adding the Eggs

Reduce the heat and add the eggs in circular motions covering the entire pan. Cook the eggs without stirring to your desired doneness. Shake the pan now and then to avoid the chicken to stick to the pan.

To serve put half on the rice in one bowl, arrange the chicken-egg-mixture on top and garnish with some Mitsuba,  chives and Shichimi if you like.

It didn’t come on a surprise that my other two daughters came home with a similar request. So by now I have mastered to blow out eggs in a short amount of time and we were left with a lot of egg-mixture. But we didn’t always make Oyakodon with it. A pretty popular dish among children is Tamagoyaki, the rolled omelet. Another staple food at our home. Stay tuned for the recipe and some tips and tricks on how to get the roling part right.